
Understanding of Users, Roles, and Permissions
A user is anyone who can access the Zetaris UI. An admin user grants permissions that decide which areas of the product each user can access and what they can do in them.
The admin user can create a role (user group) and assign it to a group of users. A role groups permissions together, so every user with that role gets the same access.
How to create Users/Roles: see User Management Overview. Users are created in Management > Users and roles in Management > Roles. Each role has a Level: Admin (full access to everything) or General (access only to what is granted).
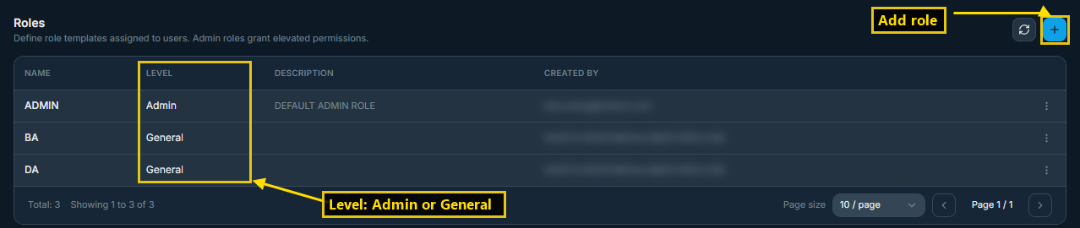
Management > Roles
The admin user can grant permission at the role level or the user level on the Permissions page (Management > Permissions). Only admin users can access this page. It has two panels:
1. Roles: lists all roles created in the environment. Access given to a role applies to every user with that role.
2. Users: lists all users created in the environment. Access given here applies to that user only.
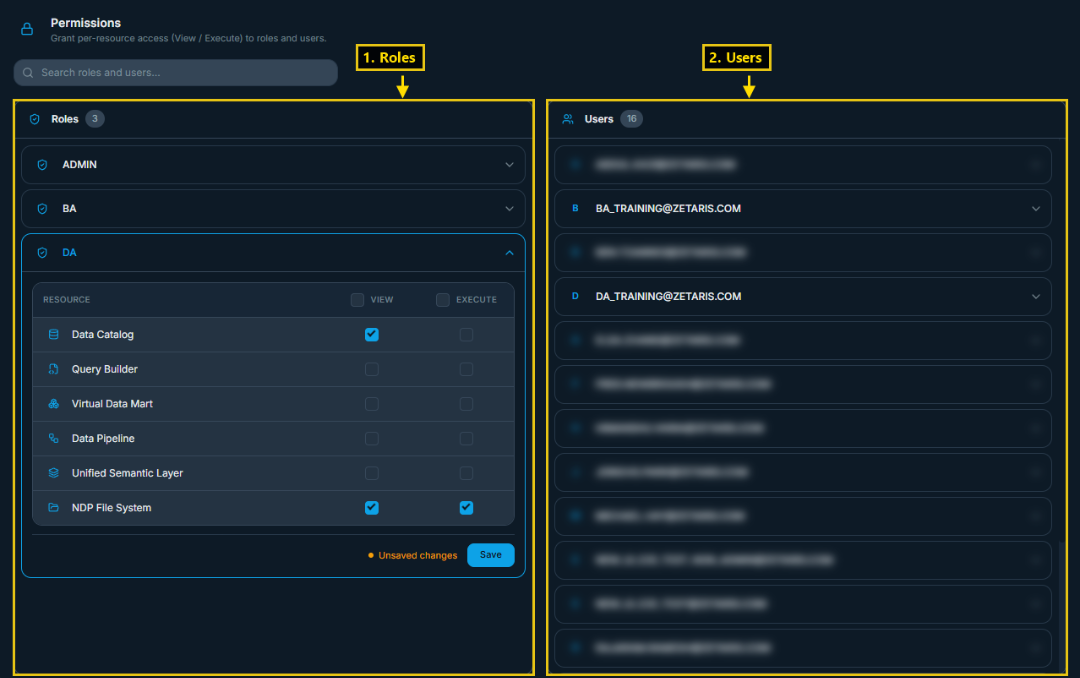
Management > Permissions
Permission/Access assigned through a Role
This makes it easier to add or remove permissions for a group of users. The admin only needs to update the permission at the role level instead of for each user.
Before you start, create the users and roles, and assign the roles to users (Management > Users, then ⋮ > Edit > Roles).
1. Go to Management > Permissions and, in the Roles panel, expand the role.
2. Tick View and/or Execute for each resource the role needs.
3. Click Save.
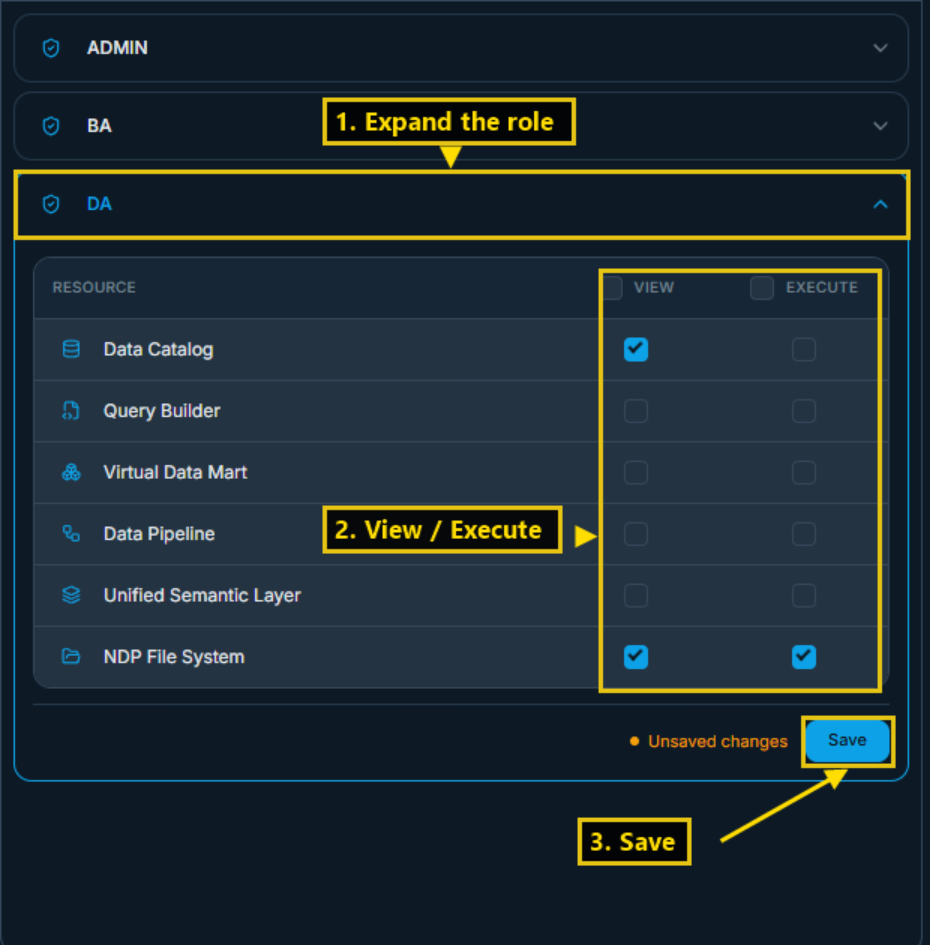
Permissions granted to the DA role
In the example above, the DA role is given access to two resources:
• NDP File System: View and Execute
• Data Catalog: View
There are two types of privilege:
• View: the user can open the resource and see only the data objects that have been shared with them through Access Control. The user cannot create data objects.
• Execute: the user can also create objects in the resource, for example create data marts in Virtual Data Mart. Ticking Execute automatically ticks View as well.
Roles with the Admin level have access to every resource, so these settings don't apply to them.
Permission/Access assigned through a User
This is useful when the permission needs to be given at the user level instead of the role (user group) the user belongs to.
1. Go to Management > Permissions and, in the Users panel, expand the user.
2. Tick View and/or Execute for each resource.
3. Click Save.
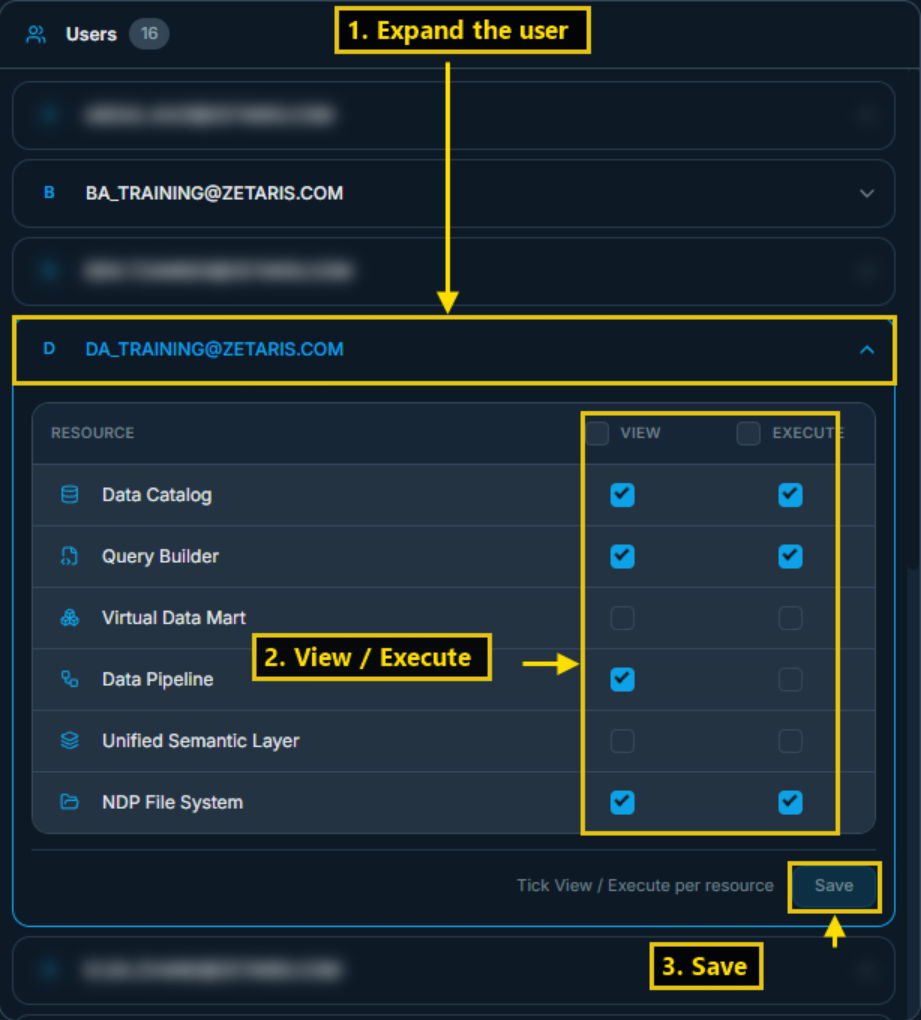
Permissions granted to DA_TRAINING@ZETARIS.COM
In the example above, the user DA_TRAINING@ZETARIS.COM has, among others:
• Query Builder: View and Execute. The user can open Query Builder and create views in it.
• Data Pipeline: View. The user can open pipelines that have been shared with them but cannot create pipelines.
Granular level of access for the Data Objects
Once the admin has given users access to a resource, the admin can also decide which data objects inside it each user can see. This is done with Access Control on each data object.
For example, to give DA_TRAINING@ZETARIS.COM access to the sales_data data source:
1. In Data Explorer, click the data source (e.g. File Source & API > sales_data). The data source opens in its own tab. Click Access Control in the toolbar. You will see two sections: Assigned Users and Assigned Roles.
2. Click Assign Users. To give access to a whole role instead, click Assign Roles.
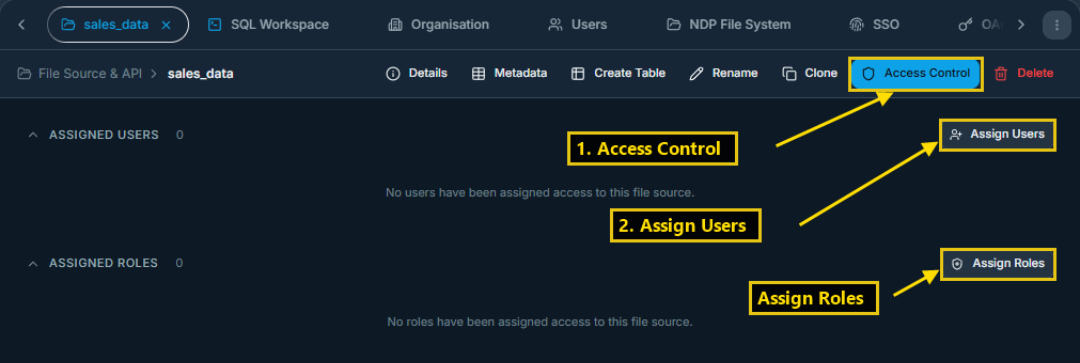
Access Control on a data source
3. A pop-up window shows the list of users. Tick DA_TRAINING@ZETARIS.COM.
4. Click Assign. The user now appears under Assigned Users.
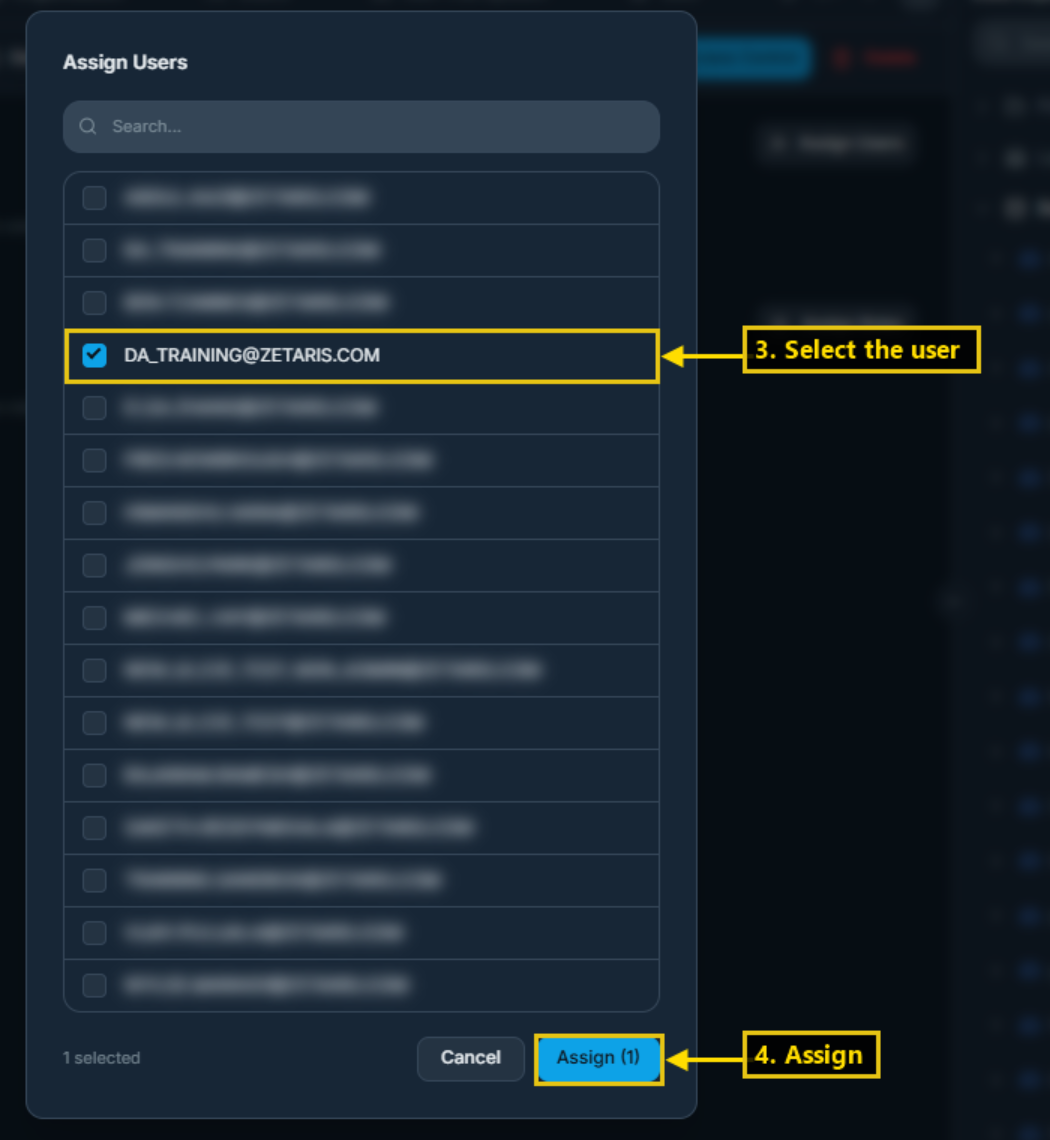
Assign Users pop-up
5. To set table-level access for an assigned user, click the user in Assigned Users. The Grant <user> to <data source> pop-up lists the tables in the data source (<data source>.* covers all tables). Use this when no column access policy applies to the user.
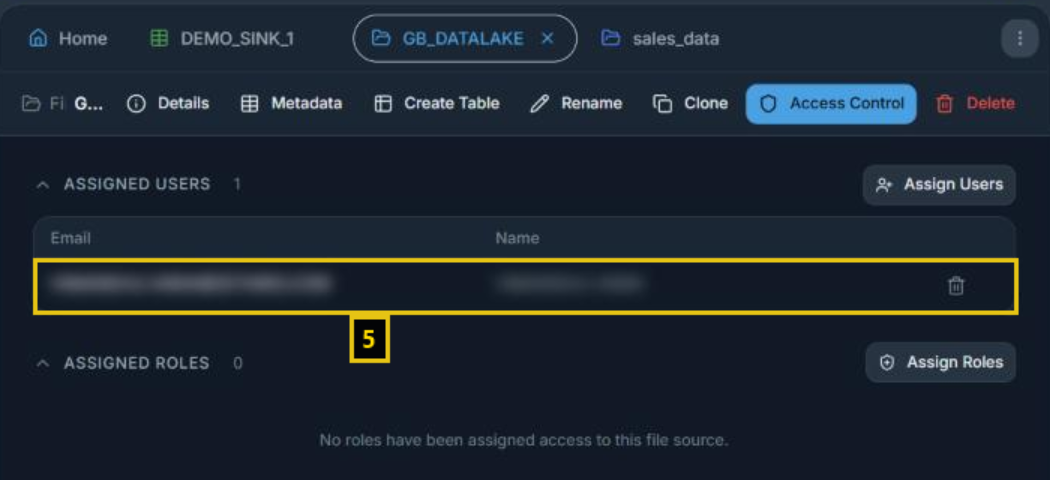
Click an assigned user to open the Grant pop-up
6. Tick SELECT (read) and/or INSERT (write) for each table. Tick the column header to apply it to every table.
7. Click Apply.
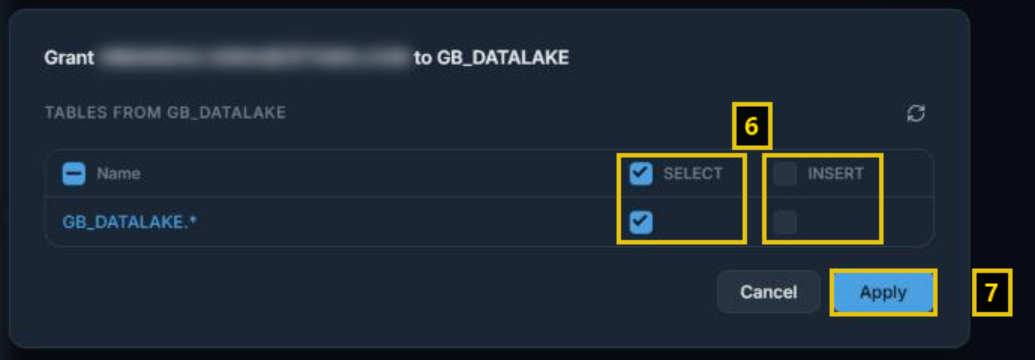
Grant SELECT / INSERT on tables
Follow the same steps to give other users access to other data sources. Each user sees only the data sources they have been assigned. In the same way, the admin can control access to other data objects, such as data marts, pipelines and views, using Access Control on each object.
For access below table level:
1. Open a table in Data Explorer and click Column Access.
2. Assign a column policy to individual users (User Policy).
3. Assign a column policy to every user in a role (Role Policies).
4. Create policies with New Policy to mask, encrypt, deny or hide individual columns. Use Policy Level Filter to restrict which rows the policy's users can see.
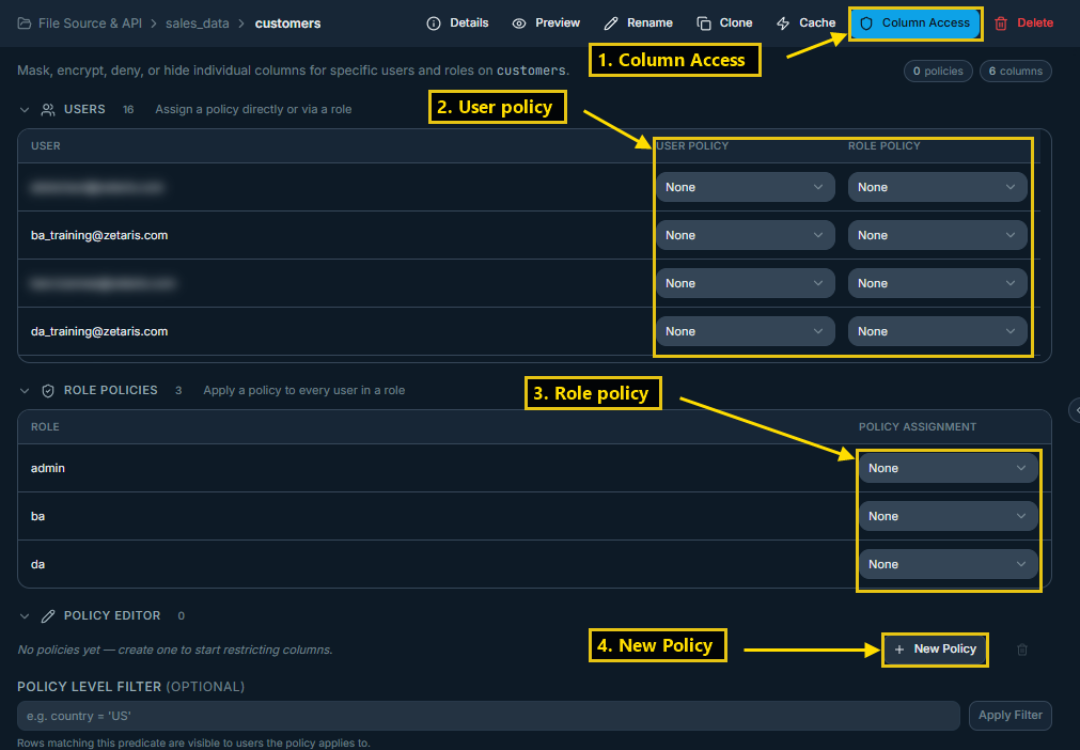
Column Access on a table