Query Builder allows you to generate complex SQL queries using a drag and drop interface. Those SQL queries can be run in an ad-hoc manner, or you can save them as permanent views to use later on.
How to use Query Builder
General Usage
To begin,
- Drag a table from one of the data sources from the panel on the left.
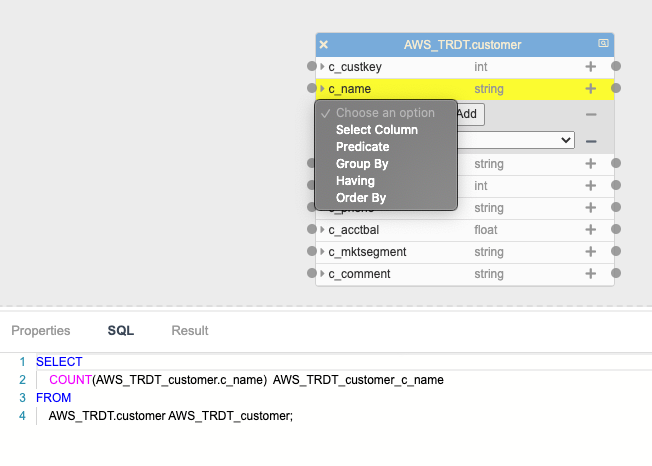
- Once a table has been dragged, click the ‘+’ icon next to the column type.
- Doing so will present a dropdown menu which allows the user to select options to apply for the table column, such as selecting/projecting the table column, adding a predicate, etc.
Clicking the caret dropdown icon can also help hide applied functionality if required.
To delete the applied column functionality, click the ‘-‘ icon.
To begin constructing a query, click on the plus icon. A new row will be added showing the different SQL clauses you can apply to a column.
To generate a query, at least one column must have a select clause (projection) applied. Click the “Select Column” option and click the “Add” button. This will apply projection to the column. Once the SELECT clause is applied, you will notice some SQL generate in the “Result” panel at the bottom.
Once you have at least one SELECT clause applied somewhere in the table, other clause options are able to be applied and reflected in the results SQL panel.
SQL Clause Types Available
The following options are the available SQL clause types you can apply to a column.
-
Select Column
-
Predicate
-
Group By
-
Having
-
Order By
Below is a step-by-step guide on how to use the following options for building SQL Queries.
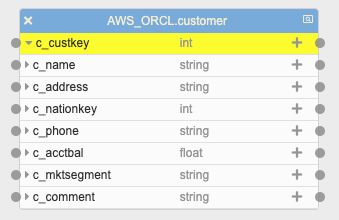
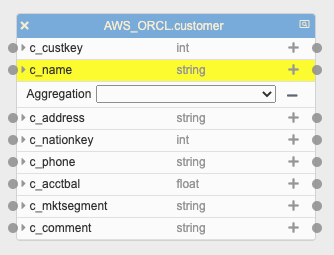
Select Column
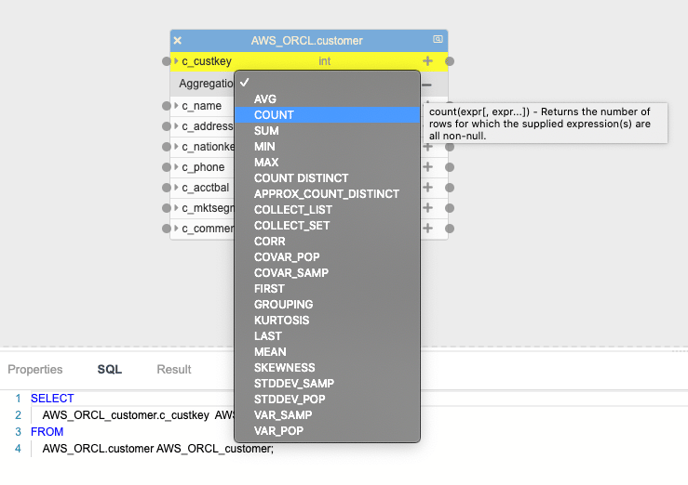
Applies projection to the column. This adds a clause row, which displays a dropdown for selecting a SQL aggregation function. The aggregation function applied to the projected column can be empty.
When choosing an aggregation function, you can also hover over any of the dropdown options and get a description of the aggregation function. The tooltip containing the description will appear after a short amount of time.
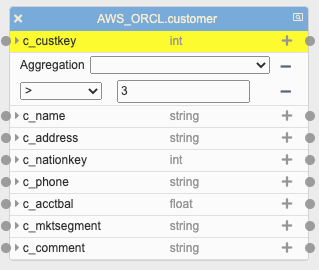
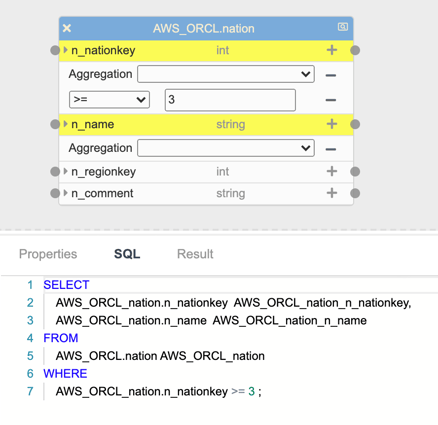
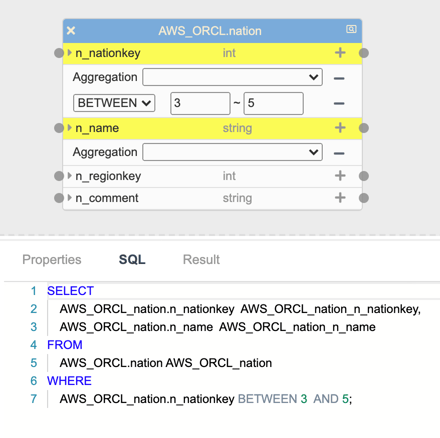
Predicate
Select the “Predicate” option from the dropdown, and click “Add”. A new predicate row in the table will appear containing a single dropdown. The predicate operators available to choose from are:
-
=
-
>
-
<
-
>=
-
<=
-
LIKE
-
BETWEEN
-
<>
-
NOT LIKE
All predicate operators in the above list will have a single input field except for the BETWEEN operator, which has two input fields. Entering a value into the input field will re-update and generate the SQL query in real-time. For the BETWEEN operator, both input fields need to be filled in before the query will reflect the BETWEEN predicate.
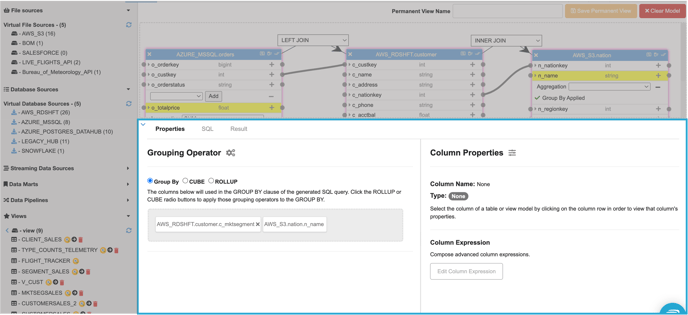
Group By and Grouping Operators
The GROUP BY clause in Query Builder can either be manually added to a column or it can be automatically applied to a column if the Query Builder detects that it needs to be added. Only one Group By clause can be applied to a column at a time. In the case of manually applying the Group By Clause, simply select “Group By” in the dropdown menu and hit “Add”.
In the case of automatic addition of the “Group By” clause, if a projected column has an aggregation function applied, the Query Builder will automatically apply a Group By to the relevant columns automatically to construct syntactically valid SQL. The minus icon will not be available, since the GROUP BY is required in this instance.
Applying the Group By clause to a column makes the column show up in the grouping operators area in the properties panel. Columns may also appear in this area if the Query Builder decides to automatically add a Group By column in response to an aggregation function being used on some other columns.
You can also make Group By columns have either the CUBE or ROLLUP subclauses be applied by clicking the radio buttons shown. If columns have either CUBE or ROLLUP applied, you can also reorder the column order that is generated in the final SQL query by dragging a column to another column in the Grouping Operator drag area.
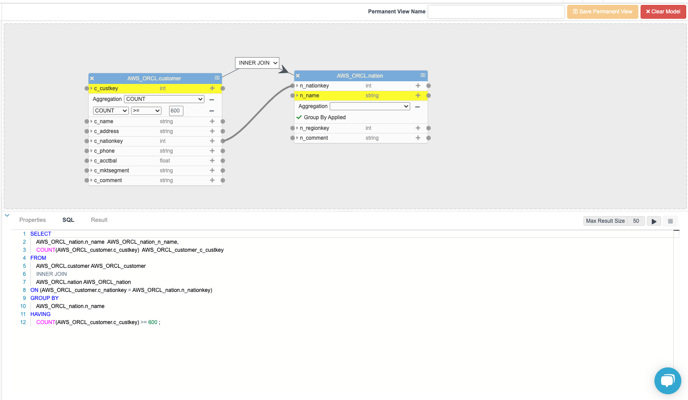
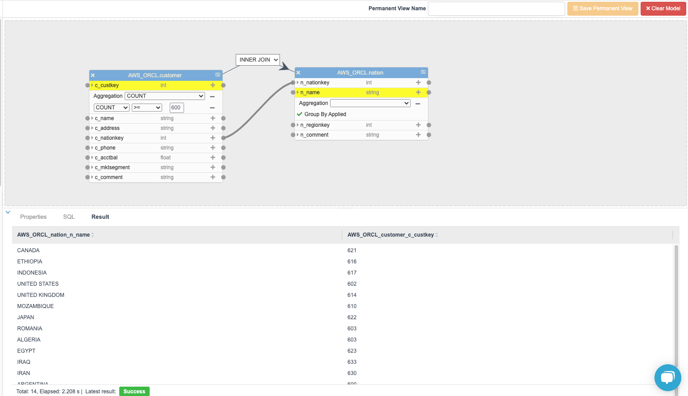
Having
To apply a Having clause, select “Having” from the dropdown and click “Add”. From this, a having clause row will appear with two drop-downs. The first one is for selecting an aggregation function. The second dropdown is for selecting a predicate operator.
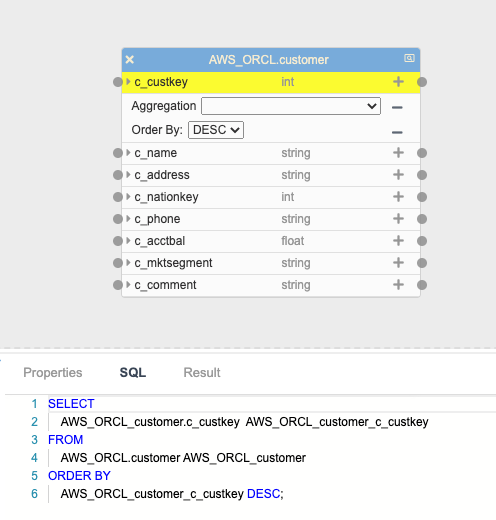
Order By
To apply an ORDER BY clause to a column, select “Order By” from the dropdown, then click “Add”. A new row is added below the column, which contains a dropdown allowing you to select either the ascending order “ASC” or descending order “DESC“ of the result set. By default, the column order is set to ASC.
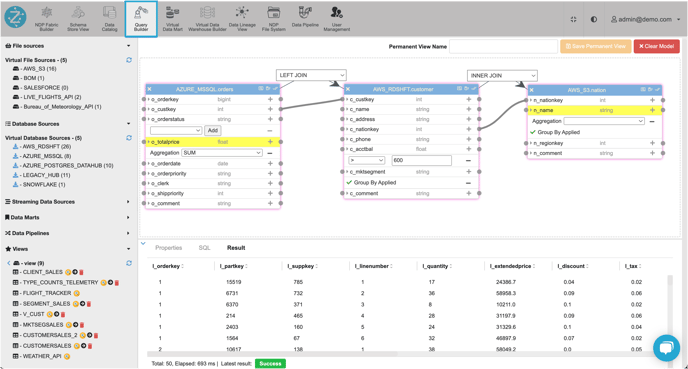
Joining Objects
The Query Builder also allows you to use ANSI SQL joins to join multiple tables together. The available join types a user can select are: INNER, LEFT, and RIGHT joins. These join types can be selected from a dropdown that appears in a table to table connection once a column to column connection is established. The default join type between two tables is the INNER join.
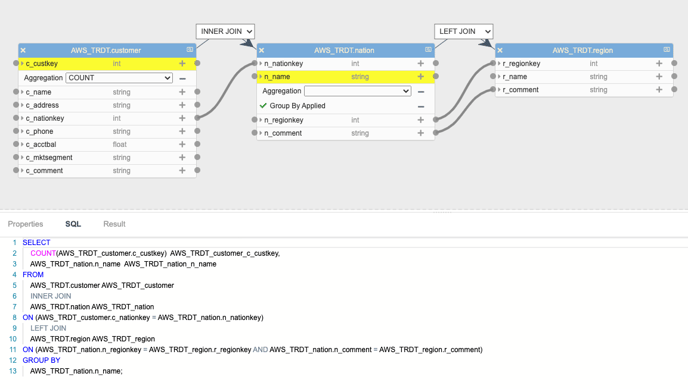
When joining a column from one table to another column in another table, the SQL Query will update in real-time to reflect the join. That is, the ON clause in the FROM … ON clause will contain the join conditions (i.e. column to column connections between two tables) separated by an AND operator.
SQL Set Operators
Select the type of set operator you want to apply from the dropdown for table joins.
The available set operators to choose from are: UNION, UNION ALL, UNION DISTINCT, INTERSECT, INTERSECT ALL, INTERSECT DISTINCT, MINUS, MINUS ALL, and MINUS DISTINCT.
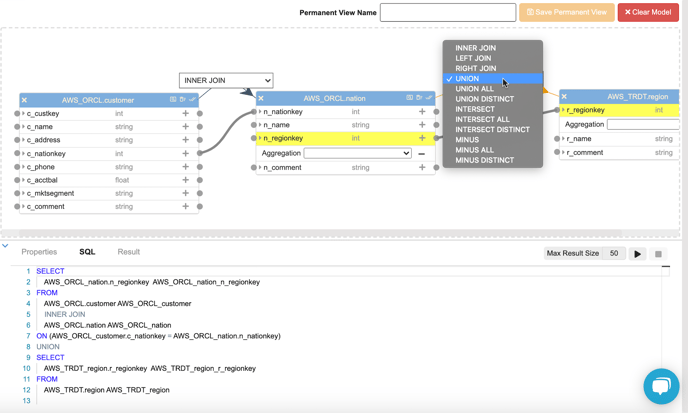
Selecting a SQL set operator will split the generated SQL into multiple SELECT statements. For example, if there is one SELECT statement present and a set operator is applied between some tables of the query, then two SELECT statements in total will be generated.
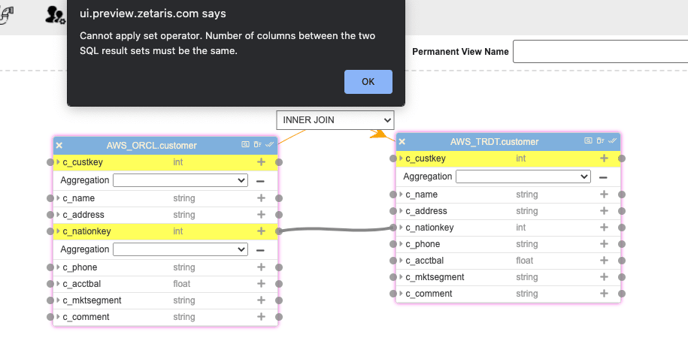
Furthermore, set operators can only be applied if the two groups separated by the set operator have the same number of selected columns. Attempting to apply a set operator by not meeting this condition will result in an error message.
You can also select a SQL select statement grouping by clicking on a table, which makes the relevant tables have a glowing outline. Selecting a grouping in this way allows you to see the grouping's details such as the group by operators applied.
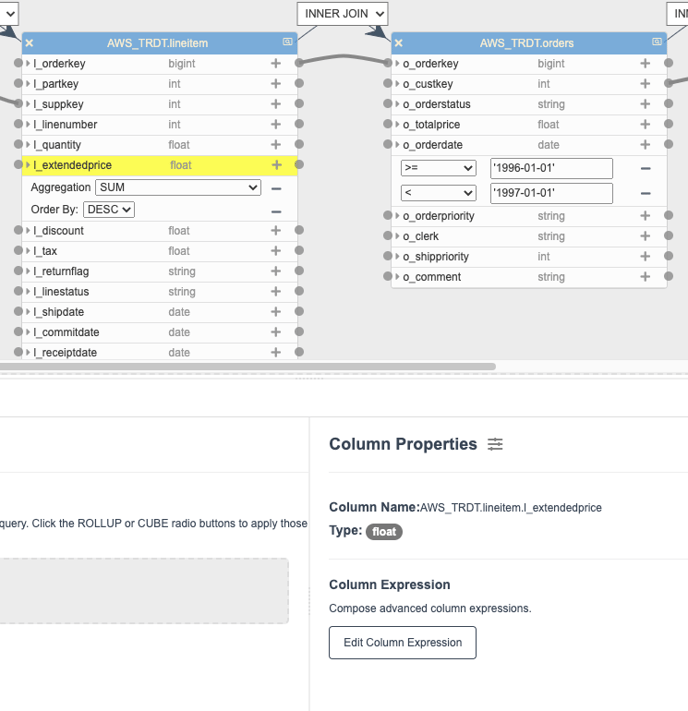
Expression Builder
Expression builder is a drag and drop GUI tool that allows users to compose advanced column expressions using Spark SQL functions. To access the Expression Builder, you must first click on a projected column (i.e. a column row that is highlighted yellow), then click on the “Edit Column Expression” button.
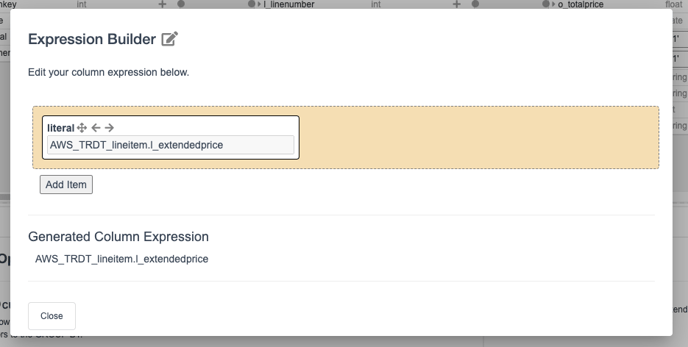
A modal will popup showing the Expression Builder. In it, you will find one item already in the drag-area, which is the column that you would like to manipulate itself. This item cannot be deleted since it is used for composing an advanced column expression around it.
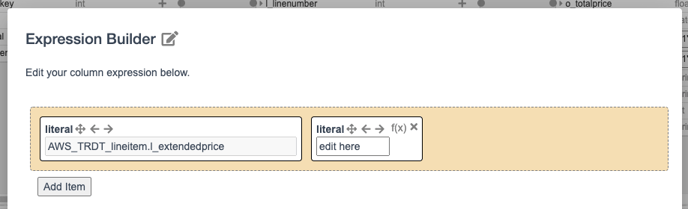
To add more items, simply click the “Add Item” button. This will add a new “literal” item, where you can edit its literal value for use in the expression.
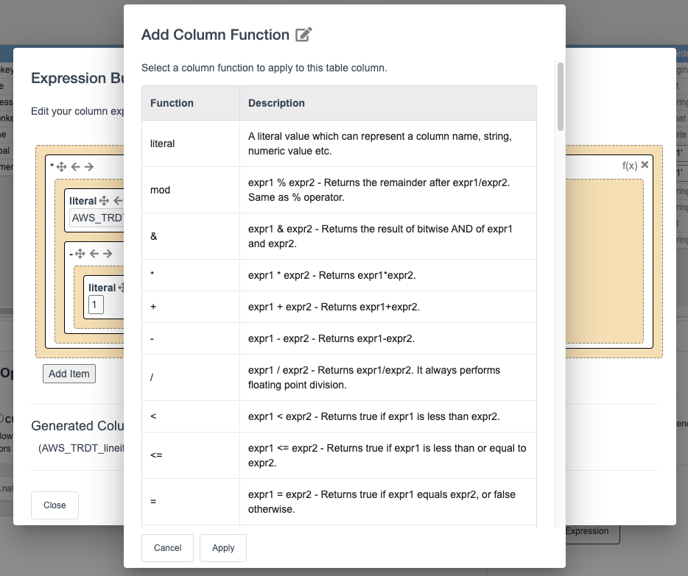
However, since this is not a valid SQL expression, we must select a Spark function. Click on the f(x) icon to change the function type of the item. This will launch a new modal that allows you to select many different column functions. Depending on the datatype of the selected column (e.g. integer, string etc.), different Spark functions will display in the table. For example, number types like float and integer will display math related functions, whereas a column with the datatype string will show functions dealing with the manipulation of strings.
When you are done composing your column expression, you can verify and look at its structure by looking at the “Generated Column Expression” section of the Expression Builder modal.
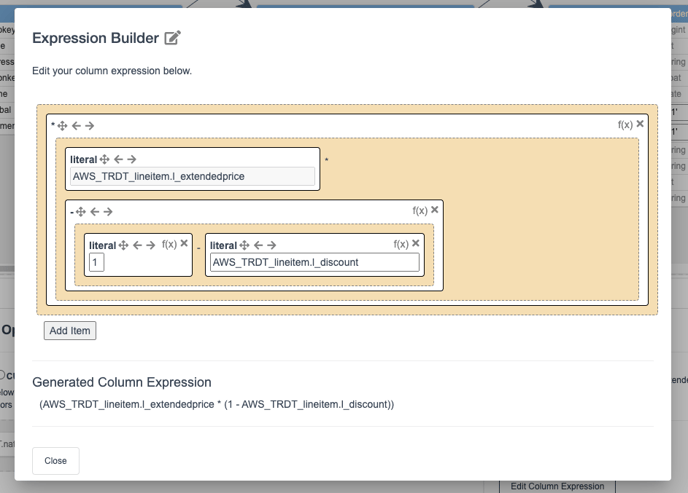
Exiting out of the modal, you will find that the generated column expression is now a part of the SQL SELECT statement.
Saving and Loading Permanent Views into Query Builder
In Query Builder, it is also possible to save, load, and render the graphs of permanent views created by Query Builder.
To save a permanent view in Query Builder, build a graph that you would like to save and enter a valid name into the “Permanent View Name” input field. When done, click the “Save Permanent View” button.

The saved view will now appear in the “Permanent View“ section on the left panel of Query Builder. To load the view into Query Builder, go to the left panel of Query Builder and then click on “Permanent View”. Afterwards, click on the “Load View” button that appears next to the view name. This will load the chosen view graph into Query Builder.
Only permanent views saved via Query Builder can have their graph be loaded into Query Builder. Permanent views created from outside Query Builder cannot be loaded into Query Builder, and the load view icon will not show in this case.
Clearing the Model
Simply click the “Clear Model” button to clear everything in the graph.