After downloading the Fluid Data Vault from the Microsoft Azure marketpace , it is necessary to follow the steps below to effectively utilize the fluid data vault on Zetaris.
Step 1:
Log in to Zetaris UI using the credentials provided in the welcome email. Click the 'utilities' button located to the right of the 'icons' on the top right corner of the page and select 'Apache Airflow.' Once inside the Airflow UI, log in with the default username and password: 'admin' and 'admin.'

Step 2:
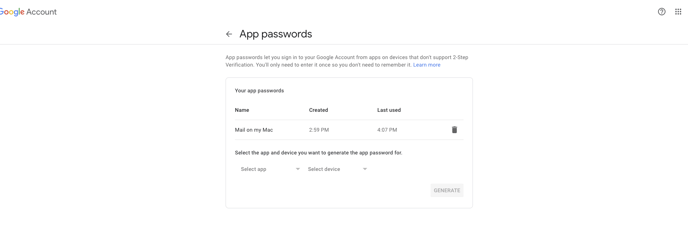
To set up Outlook Email notifications, create an application password on your Google account by visiting the link: https://myaccount.google.com/apppasswords. Select the app and device you're using, generate an app password, and contact the Zetaris Team with your Google email address and application password to add the credentials to the Airflow configuration file.
Step 3:
To set up Failure Notifications on Microsoft Teams, open up Teams, browse to the channel where you want the messages to be sent, and click the ‘configure' (. . .) icon beside the channel name on the top right. Then select 'Connectors' and search for 'Incoming Webhook.' Click 'Configure,' provide a webhook name, say 'airflow-webhook’ , and select 'Create.' A Webhook URL will be generated.
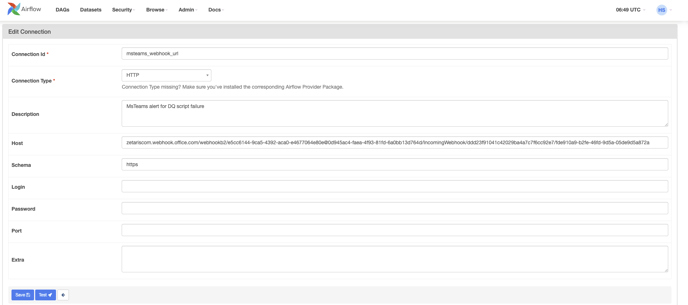
Step 4:
Add a connection on the Airflow UI by clicking 'Admin' and selecting 'Connections' from the dropdown list. Click 'Add' and add the respective parameters as shown in the image. Use 'msteams_webhook_url' as the Connection Id, 'HTTP' as the Connection Type, 'https' as the Schema, and the webhook URL from Step 3 as the 'Host.'
Step 5:
Create and add a Git repository for version control and approval mechanism. Create a Git repository named 'RawVault' and add a branch named 'ddl_dml_statements' to store all the statements generated from the pipelines. Generate a token using the link: https://github.com/settings/tokens - Connect your Github account (under personal access tokens → tokens classic) and add a branch protection rule for the 'main' branch, requiring a pull request before merging.
Step 6:
Add the specified variables on the Airflow UI by clicking 'Admin' and selecting 'Variables.' Copy the exact variable names from the table and add the necessary values.
|
Variable Name |
Example |
|---|---|
|
Email_Address |
<your_email_address> |
|
Github_Org_Name |
<your organisation_name> e.g. zetaris |
|
Github_Repo_Name |
<your_repository_name> e.g. RawVault |
|
GitHubToken |
generated in above step, e.g. 'ghp_f98OJZORwc0SsdvnsdiqQoBkHF9yW51oqJox' |
|
GitHub_File_URL |
https://api.github.com/repos/zetaris/RawVault/contents/ |
|
Github_Pull_Request_URL |
https://api.github.com/repos/zetaris/RawVault/pulls |