Pre-requisites:
Please prepare all secret, config, and key files.
You will need access to Zetaris Helm charts on Github.
Contact the Zetaris team to obtain these files and access to Github.
- Introduction
- Overview
This guide provides detailed instruction on how to install Zetaris software on VMware Tanzu. - How to Use this Guide
- Introduction explains the purpose of the document along with its structure and defines the audience.
- Installation Prerequisites list all the prerequisites to plan an installation in your environment.
- Installation Instructions provides the installation procedure.
- References
Setting up spark workloads on Openshift
https://cloud.redhat.com/blog/getting-started-running-spark-workloads-on-openshift - Zetaris Support
We are committed to providing the highest level of support to Zetaris users. If you encounter any issue or need assistance with the installation, or suggest improvements, please contact our support team.
- Overview
- Installation Prerequisites
For installing Zetaris software we need to have the following components running:
Component
Requirement
VMware Tanzu
Admin Access to VMware Tanzu
Postgres
Zetaris requires Postgres for its internal function
Zetaris GUI, API, Backend docker images
Actual Zetaris docker images for installation
NFS File System
Zetaris requires a FileShare with Readwritemany access for persistent storage
Certificate Manager
Deploy a certificate for Zetaris to use Https
- PostgreSQL installation
Install a PostgreSQL server external to the VMware Tanzu cluster and ensure that the cluster has access to this PostgreSQL instance.
Make sure you use a version of PostgreSQL above 13.
- Install PostgreSQL on your server : https://www.postgresql.org/download/
- Initialize and start the database
sudo postgresql-setup initdb
sudo systemctl start postgresql - Login to postgresql and set a password
su – postgres psql
ALTER USER postgres WITH PASSWORD 'NewPassword';
Create an admin user (rds_admin) using:
create role rds_admin superuser login password 'password';
Create the required databases for Zetaris:
create database metastore;
create database audit_log;
create database airflow_db;
Grant all privileges on databases using:
grant all privileges on database metastore to rds_admin;
grant all privileges on database audit_log to rds_admin;
grant all privileges on database airflow_db to rds_admin; -
Enable SSL for postgres:
Generate a new certificate using openssl.openssl genrsa -aes128 2048 > server.key
Go to the var/lib/pgsql/#{version}#/data directory and modify the postgresql.conf file:
openssl rsa -in server.key -out server.key
chmod 400 server.key
chown postgres.postgres server.key
openssl req -new -key server.key -days 365 -out server.crt -x509
cp server.crt root.crt
-
- Set listen_addresses=’*’
- Set SSL to on by modifying these lines:
ssl = on
ssl_ca_file = 'root.crt'
ssl_cert_file = 'server.crt'
ssl_crl_file = ''
ssl_key_file = 'server.key'
ssl_ciphers = 'HIGH:MEDIUM:+3DES:!aNULL' # allowed SSL ciphers
ssl_prefer_server_ciphers = on
host      all         all         0.0.0.0/0         md5

hostssl   all         all         0.0.0.0/0         md5
Restart the postgresql using sudo systemctl restart postgresql-{version}.
-
- Install the Spark Operator
Spark operator is needed to manage Zetaris Spark application on helm charts.
Add the spark operator repo;helm repo add spark-operator https://googlecloudplatform.github.io/spark-on-k8s-operator
Install the spark operator;
helm install spark-operator spark-operator/spark-operator --namespace spark-operator --create-namespace --set webhook.enable=true --set resourceQuotaEnforcement.enable=true
- Install Ingress Nginx
Ingress Nginx is needed for the load balancing so that Zetaris application can be accessible.
Add the Ingres Nginx repo:
helm repo add ingress-nginx https://kubernetes.github.io/ingress-nginx
Install ingress-nginx
helm upgrade --install lightning-ingress ingress-nginx/ingress-nginx --namespace ingress-nginx --create-namespace --version 4.0.18 --set rbac.create=true --set rbac.createRole=true --set rbac.createClusterRole=true --set-string controller.config.proxy-body-size=100m --set-string controller.config.server-tokens=false --set controller.config.generate-request-id=\"false\"
-
Configure Certificates
To install cert-manager:
TLS Certificates
Use your certificate authority to issue a TLS certificate for Zetaris to be able to use HTTPS.helm repo add jetstack https://charts.jetstack.io
helm upgrade --install cert-manager jetstack/cert-manager --namespace cert-manager --create-namespace --version v1.7.0 --set installCRDs=trueYou then have to create a secret with the certificate issued by your CA.
apiVersion: v1
kind: Secret
metadata:
  name: #{ca-secret}#
type: kubernetes.io/tls
data:
  tls.crt: --BASE64 ENCODED STRING--
  tls.key: --BASE64 ENCODED STRING--
Once you created this secret, make sure you specify the name of your ca-secret in the solr/tanzuvalues.yaml file, so that the cluster issuer retrieves this certificate (cf part 8)
Note: If you cannot provide a TLS certificate, you can use letsencrypt to provide publicly signed certificates if the cluster is publicly accessible from the net.
Encryption keys
Use OpenSSL to generate public and private keys to encrypt the password in Zetaris
#Generate a private_key.pem

openssl genrsa -out private_key.pem 2048

#Generate a private_key.der

openssl pkcs8 -topk8 -inform PEM -outform DER -in private_key.pem -out private_key.der -nocrypt

#Generate a public_key.der

openssl rsa -in private_key.pem -pubout -outform DER -out public_key.der
Use public and private keys generated to create a k8s secret for password encryption in your namespace
Kubectl create namespace {yournamespace}
kubectl create secret generic lightning-password-security-encryption-secret --from-file=private_key.der --from-file=public_key.der –-namespace {yournamespace} - Configure NFS
Zetaris requires a ReadWriteMany file system to store persistent data.
Create a NFS in Tanzu and create a nfsvalues file as follows, and add the file share name and mount path in the values file.
nfs:
Once created, you can install the storage class using the NFS helm charts
# The NFS server endpoint that we got from vSAN FS
server: vsan-fs01.tanzu.lab
# The NFS share mount path from vSAN FS
path: /share01
storageClass:
# The name of the StorageClass to be created on the K8s cluster to allow provisioning of RWM volumes from the share
name: nfs-external
# The accessMode that we want to be created from these subvolumes
(ReadWriteMany allows multiple containers to mount it at once) accessModes: ReadWriteMany podSecurityPolicy:
# Enabling the pod security policy allows it to run on TKGS clusters out of the box
enabled: true
helm repo add nfs-subdir-external-provisioner https://kubernetes-sigs.github.io/nfs-subdir-external-provisioner
helm repo update
kubectl create namespace infra
helm install nfs-subdir-external-provisioner --namespace infra nfs-subdir-external-provisioner/nfs-subdir-external-provisioner -f nfsvalues.yaml
- PostgreSQL installation
- Install Zetaris
Clone the helm charts from the git repository https://github.com/zetaris/TanzuInstallation
- Modify the values file for each component
- Modify the necessary “tanzuvalues.yaml” that are tokenized (between #{}#) for each component (server, gui, api, solr and airflow).
- Make sure:
- The components are correctly configured to the PostgreSQL server.
- The URL corresponds to the certificate issued for https.
- In the lightning-server values, specify cores and executors according to your cluster size. (a minimum of 2CPU and 8GBram is recommended per executor).
- The image is by default pointing to the latest stable version, there is no need to modify this value.
- Run the helm install script
From the root directory, modify the bash scripts to point to your namespace (by default zetaris) and run them to deploy the different components:./lightning-server/deploy-lightning-server Y
./lightning-api/deploy-lightning-api Y
./lightning-gui /deploy-lightning-gui Y
./solr/deploy-solr YAll pods should be in running state. If there is any error, please contact us.
- Modify the values file for each component
- Install Airflow
- Install official airflow image
- To install airflow, add the official airflow helm charts to your help repo:
helm repo add apache-airflow https://airflow.apache.org
-
Modify the airflowvalues file located in the airflow directory.
-
You can specify some environment variables for airflow from this values file.
-
It is recommended to add your Zetaris user credentials and JDBC IP to take advantage of airflow.
-
You can also add credentials for notification emails.
-
If you don’t have these information now, you will be able to set them in airflow UI.
- Make sure you specify the PostgreSQL server for your airflow to have persistent storage. You can then deploy airflow using :
helm upgrade --install airflow apache-airflow/airflow -f ./airflow/airflowvalues.yaml --namespace airflow --create-namespace
- To install airflow, add the official airflow helm charts to your help repo:
- Install service for airflow
- Modify the values.yaml file in the airflow directory, by configuring your postgresql instance and your NFS file share name.
- You can then run to deploy ingress:
./airflow/deploy-airflow.sh ing
- Airflow will then be accessible directly from Zetaris UI, or at
airflow.#{deploymentname}#.#{dnsdomain}#
- Install official airflow image
- Create a DNS record for your application
- Add a DNS record for your application.
- Use kubectl get ingress -n {yournamespace} to retrieve the public IP of the UI, can create a DNS record in your DNS zone with the name *.{yourdeploymentname}.{yourdnsdomain}.
- This must match your certificate to enable https.
- Create your user account
- Login to ‘lightning-server-driver’ pod using
kubectl exec -it lightning-server-driver -n {yournamespace} -- bash - Run the dev-account.sh script to create your first admin user:
/home/zetaris/lightning/bin/dev-account.sh admin@zetaris.com password organisation
- Login to ‘lightning-server-driver’ pod using
- Launch Zetaris
- Open your browser from any computer that is connected to VM and can access the machine on which Zetaris is installed. Use the DNS created earlier to launch Zetaris from browser window.
-
Please enter user email and password that you created earlier
- Open your browser from any computer that is connected to VM and can access the machine on which Zetaris is installed. Use the DNS created earlier to launch Zetaris from browser window.
- Annexes
Install Zetaris with GPU- Make sure your Cluster has allocatable GPUs.
-
Run kubectl get nodes to see the node available in your cluster.
-
Run kubectl describe node <nodename> to get information about your GPU node, and make sure you can see some GPU capacity:
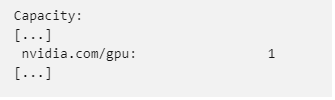
-
The easiest way to make use of these GPU in a Kubernetes cluster is to use the nvidia GPU operator, which will detect the GPU on your nodes and make them available to use: Installing the NVIDIA GPU Operator — gpu-operator 23.6.0 documentation It can be installed with a single helm command:
helm repo add nvidia https://helm.ngc.nvidia.com/nvidia && helm repo update
helm install --wait --generate-name \ -n gpu-operator --create-namespace \ nvidia/gpu-operator
-
- Modify the backend base image
- Zetaris has a dedicated image for GPU based on the nvidia cuda official image in order to run spark applications on GPU. Please contact us if you need this image ID.
- Add the required configuration in the spark configuration
- In the spark configuration part of the helm deployment, add the following params: (once the application is deployed, you can use kubectl edit sparkapplication lightning-server -n zetaris to modify the configs).
- Make sure the extra class path contains the spark rapid jar path.
spark.driver.extraClassPath:
/home/zetaris/lightning/conf:/home/zetaris/lightning/other/*:/home/zetaris/lightning/lib/com.nvidia.rapids-4-spark_2.12-23.06.0.jar
spark.executor.extraClassPath:
/home/zetaris/lightning/other/*:/home/zetaris/lightning/lib/com.nvidia.rapids-4-spark_2.12-23.06.0.jar - Add these GPU parameters:
- The getGPUResource script is already copied from the image and is needed by sparkrapid)
- Only 1 GPU per executor is allowed, but you can use the task.resource.gpu.amount to be 0.5.
- Adapt the spark rapid memory values according to your cluster size.
spark.executor.resource.gpu.amount: "1"
spark.executor.resource.gpu.vendor: "nvidia.com"
spark.executor.resource.gpu.discoveryScript:
/home/zetaris/lightning/bin/getGpusResources.sh
spark.plugins: "com.nvidia.spark.SQLPlugin"
spark.rapids.sql.concurrentGpuTasks: "2"
spark.task.resource.gpu.amount: "1"
spark.rapids.memory.pinnedPool.size: "2G"
spark.rapids.memory.host.spillStorageSize: "4g"
spark.sql.shuffle.partitions: "20" - On the executor declaration, add this block to make sure the executor request 1 GPU from the nodes.
executor:
  gpu:
    name: nvidia.com/gpu
    quantity: 1
Your application should now be running on GPUs. You can check the logs of your lightning-server-driver and run a simple command to see the GPU logs.
- Make sure your Cluster has allocatable GPUs.