Pre-requisites:
Please prepare all secret, config, and key files. Contact the Zetaris team to obtain these files.
- Introduction
- Overview
This guide provides detailed instruction on how to install Zetaris software on Red Hat OpenShift. - How to Use this Guide
- Introduction explains the purpose of the document along with its structure and defines the audience.
- Installation Prerequisites list all the prerequisites to plan an installation in your environment.
- Installation Instructions provides the installation procedure.
- References
Setting up spark workloads on Openshift
https://cloud.redhat.com/blog/getting-started-running-spark-workloads-on-openshift - Zetaris Support
We are committed to providing the highest level of support to Zetaris users. If you encounter any issue or need assistance with the installation, or suggest improvements, please contact our support team.
- Overview
- Installation Prerequisites
For installing Zetaris software we need to have the following components running:
Component Requirement Red Hat OpenShift OpenShift version 4.10.40 with kubeadmin level access.
oc command line tool
Required to execute command on Red Hat OpenShift cluster
Docker Hub access
Access to Zetaris docker hub can be given by Zetaris Sys admin
Postgres Zetaris 2.3.3.0 requires Postgres for it’s internal function
Zetaris GUI, API, Backend docker images
Actual Zetaris docker images for installation
- Setup the ‘namespace’ and ‘serviceaccount’
- Login to Red Hat OpenShift cluster using kubeadmin credentials from oc command line tool.
- Create a new project using
oc new-project zetaris
- Create service account for all pods to run with appropriate level of access. Use this command
oc create sa zetaris-sa-scc-anyuid -n zetaris
- Add the service account in the anyuid scc. Use this command.
oc adm policy add-scc-to-user anyuid -z zetaris-sa-scc-anyuid -n zetaris
- Add the service account and policy to the project. Use the following command
kubectl create clusterrolebinding spark-role --clusterrole=edit --serviceaccount=zetaris:zetaris-sa-scc-anyuid --namespace=zetaris
- Postgres Installation
Please install Postgres external to Red Hat OpenShift cluster. Also please ensure that Red Hat OpenShift cluster can have access to this Postgres instance.
- Install PostgreSQL on CentOS
sudo yum install postgresql-13-server postgresql-contrib
- Initialise the database
sudo postgresql-setup initdb
- Start the database
sudo systemctl start postgresql
-
PostgreSQL basic setup
- Change user to postgres
su – postgres
- Login to database
psql
- Set new password for default user “postgres”
ALTER USER postgres WITH PASSWORD 'NewPassword';
- Change user to postgres
- Open terminal and run;
psql
- Create user rds_admin and make this user database admin. Please keep a note of its password as it is required for connecting to database.
create role rds_admin superuser login password 'password';
- Create database metastore using,
create database metastore;
- Create database audit_log using,
create database audit_log;
- Grant all privileges on database metastore using,
grant all privileges on database metastore to rds_admin;
- Grant all privileges on database audit_log using,
grant all privileges on database audit_log to rds_admin;
- Install PostgreSQL on CentOS
- Install the Spark Operator
- Add the spark operator repo;
helm repo add spark-operator https://googlecloudplatform.github.io/spark-on-k8s-operator
- Install the spark operator;
helm install spark-operator spark-operator/spark-operator --namespace spark-operator --create-namespace --set webhook.enable=true --set resourceQuotaEnforcement.enable=true
- Add the spark operator repo;
- Create the secrets
- Apply the secrets manifests yaml;
oc apply -f zetaris-manifests-secrets.yaml
- Create secret lightning-password-security-encryption-secret in project Zetaris using following key and values. In our setup we have used Red Hat OpenShift GUI Console to do this.
Key Value private_key.der private_key.der file provided by Zetaris pubic_key.der public_key.der file provided by Zetaris
- Apply the secrets manifests yaml;
- Create the config maps
Apply the configmaps manifests yaml;
oc apply -f zetaris-manifests-configmaps.yaml
- Create the deployments
Apply the deployments manifests yaml;
oc apply -f zetaris-manifests-deployments.yaml
- Create the services
Apply the services manifests yaml;
oc apply -f zetaris-manifests-svcs.yaml
- Create the routes
Apply the routes manifests yaml;
oc apply -f zetaris-manifests-routes.yaml
- Install Solr
- Pull the solr helm chart
helm pull registry-1.docker.io/zetaris/solr
- Run the helm chart as below:
helm upgrade -i --create-namespace -n zetaris solr -f values.yaml
Here is the explanation of the helm value attributes found in values.yaml:
Registrysecretname – The secret that holds the auth creds for zetaris’ dockerhub account so that K8s can pull the solr image.
Sslname – The name of LetsEncrypt Issuer.
Emailaddress – Any relevant email address. This is needed by the Issuer.
If you don’t understand any other attribute, just leave the values the way it is or replace it with blank.
- Pull the solr helm chart
- Install Airflow
- Install official airflow image
To install airflow, add the official airflow helm charts to your help repo:
helm repo add apache-airflow https://airflow.apache.org
Modify the airflowvalues.yaml file :
-
You can specify some environment variables for airflow from this values file.
-
It is recommended to add your Zetaris user credentials and JDBC IP to take advantage of your airflow environment.
-
You can also add credentials for notification emails.
-
If you don’t have these information now, you will be able to set them in airflow UI.
-
Make sure you specify the PostgreSQL server for your airflow to have persistent storage.
- You can then deploy airflow using :
helm upgrade --install airflow apache-airflow/airflow -f ./path/to/your/airflowvalues.yaml --namespace airflow --create-namespace
-
- Install service for airflow
After installing airflow, you will need to create a service to redirect to airflow.
-
Retrieve the helm template here HelmDeployment/airflow-ing/azure at main · zetaris/HelmDeployment (github.com).
- Modify the values file to have your persistent volume configured for airflow Dags, and run the helm install command to create the PV and the service:
helm upgrade -i --create-namespace -n airflow airflow-ing -f airflow-ing/aws/eks-load-testing-cluster.airflow.values.yaml airflow-ing/aws
-
Once done, specify the airflow apache URL in the lightning-gui deployment as an environment variable so that it appears in the UI.
- Run kubectl edit deployment lightning-gui -n zetaris and add the following variable if not already existing:
     containers:
…
         env:
…
            - name: APACHE_AIRFLOW_URL

value: https://airflow.. -
Airflow will then be accessible directly from Zetaris UI, or airflow.#{deploymentname}#.#{dnsdomain}#.
-
- Install official airflow image
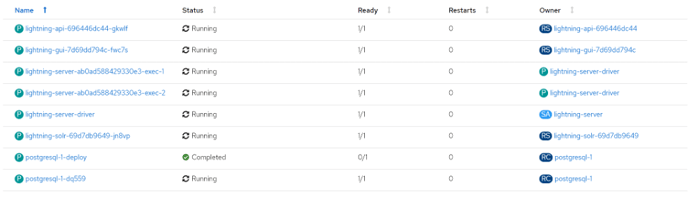
- Final deployment should contain running pods as shown below;
- Create Lightning user account
- Login to ‘lightning-server-driver’ pod
- Run the dev-account.sh script
/home/zetaris/lightning/bin/dev-account.sh
- Launch Zetaris
-
- Please Open browser window (preferably chrome) from any computer that is connected to VM and can access the machine on which Zetaris is installed.
- Use URL from route created earlier (e.g. http://zetaris-zetaris.apps.zetaris.iac.ssc) to launch Zetaris from browser window.
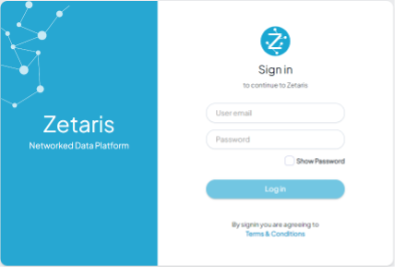
- Please enter user email: dev@account.com
- Please enter the password: password
- This should log you in. and see Zetaris front end.