
This article describes how to upload a local JSON or CSV file to the Zetaris NDP File System and register it as a virtual table so it can be queried through SQL.
The process involves two main steps:
1. Upload the file to the NDP File System (Zetaris internal storage).
2. Register the uploaded file as a virtual table using the Create Table wizard.
|
Prerequisite: You must have access to a File Source & API data source (e.g. public_demo) in the Data Explorer. If you do not see one, contact your Zetaris administrator. |
Part 1: Upload Files to the NDP File System
The NDP File System is internal storage within the Zetaris platform. You can upload JSON, CSV, XML, Parquet and ORC files here before registering them as tables.
1. In the left sidebar, click NDP File System. The root directory lists the storage folders, including file-store and key-trust-store.
2. Open the file-store folder. This is where data files are stored.
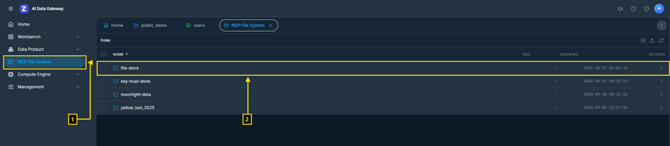
NDP File System root directory
3. To organise your files, create a subfolder. Click the New folder icon in the toolbar (top-right), enter a folder name (e.g. json_files) and press Enter or click the checkmark to confirm.

Creating a subfolder in file-store
4. Open your folder, then click the Upload icon in the toolbar. An upload panel appears at the top of the page. Drag your JSON or CSV file into the drop zone, or click Browse files to select it from your computer.
5. The file is listed as ready. Click the Upload icon in the panel to upload it.

Upload panel: drag files or click Browse files, then Upload
6. The uploaded file appears in the folder listing.

Uploaded file visible in the NDP File System
|
Tip: You can upload multiple files at once by dragging them together into the drop zone. |
Part 2: Register the File as a Virtual Table
Once the file is uploaded, register it as a virtual table so it can be queried with SQL.
7. In the Data Explorer (left panel), expand File Source & API and click your data source (e.g. public_demo) to open its detail page. In the toolbar, click Create Table to launch the three-step wizard.

File source detail page with Create Table
8. Step 1, Source Type: select File store (the default) and click Next.
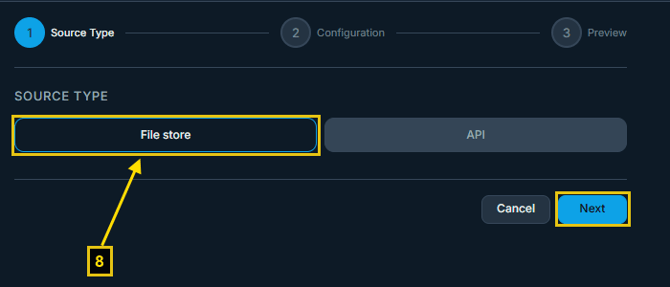
Create Table wizard, Step 1: Source Type
Step 2, Configuration: configure the following fields (9 to 12), then click Next (13).
|
Field |
Description |
|
File Format |
Select the format of your file: CSV, JSON, XML, Parquet or ORC. |
|
Storage Provider |
Select NDP File System. No cloud credentials are needed. |
|
Table Name |
Enter a name for the virtual table (e.g. customers). |
|
Files |
An inline file browser shows the /file-store directory. Open your folder and select the file to register. |
|
Delimiter |
CSV only. Set the column delimiter character (default: comma). |
|
Additional Parameters |
Optional. Add key-value pairs such as header=true or inferSchema=true. |
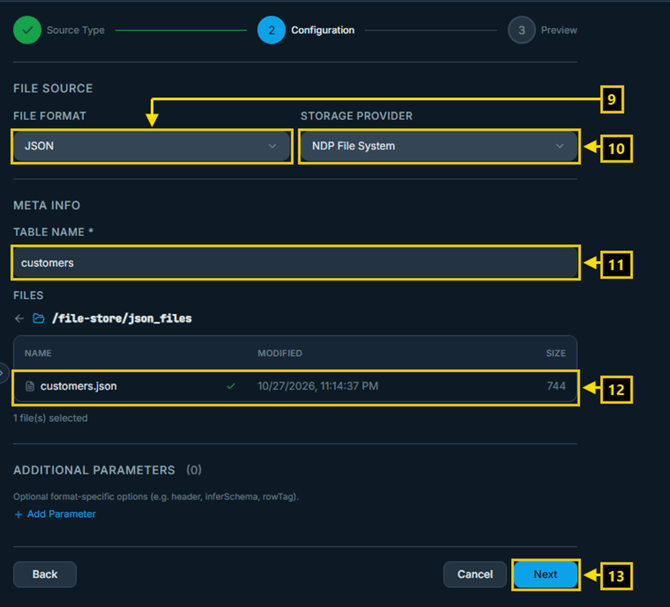
Create Table wizard, Step 2: Configuration with NDP File System
Step 3, Preview: review the detected columns and sample rows (14). If everything looks correct, click Create (15) to register the table.
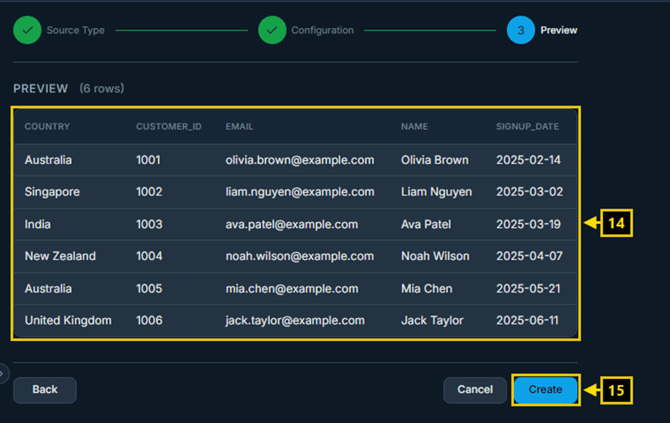
Create Table wizard, Step 3: Preview
|
Note: For JSON files, the Delimiter field is hidden. Each JSON file is read as one JSON document, so store multiple records as a JSON array. For CSV files, the header and inferSchema parameters appear by default. |
Verify the Table
After registration, confirm the table is available:
16. The new table appears in the Table Metadata list of your data source and in the Data Explorer tree.

New table listed under the data source
17. Open Workbench > SQL Workspace and run a query to test the table:
SELECT * FROM public_demo.customers LIMIT 10;
18. Click Execute (or press Ctrl+Enter).
19. The query results confirm that the file has been successfully registered and is queryable through SQL.
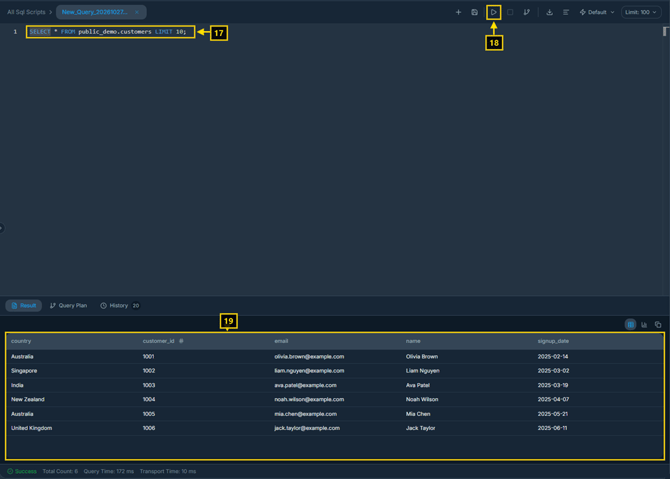
Query results in SQL Workspace
Summary
|
Step |
Action |
|
1 |
Open the NDP File System from the left sidebar |
|
2 |
Open file-store and create a subfolder if needed |
|
3 |
Upload your JSON or CSV file using the Upload tool |
|
4 |
Open your File Source in the Data Explorer and click Create Table |
|
5 |
Select File store as the source type |
|
6 |
Set File Format, choose NDP File System as the storage provider and select the file |
|
7 |
Preview the data and click Create |