There are several steps to deploy on AWS EKS from our existing Azure AKS progress.
Prerequisite
-
Terminal
-
Install AWS cli version 2+
-
Helm3
-
kubectl
-
postgres 11 database (in case no PostgreSQL database is available then fresh installation steps are mention in last of the document)
-
Soft link to yaml files (need to have this on terminal) - Download
The above link is security protected. Contact your Zetaris representative for access.
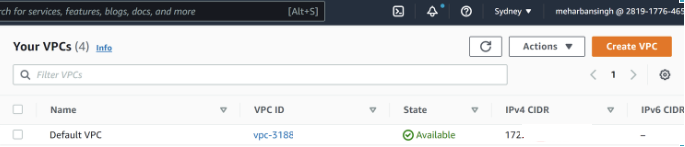
Step 1 - Create a new VPC
- This step is to spin up a new virtual private cloud to run our EKS cluster.
- We can use default VPC then skip this step.
Step 2 - Create MasterClusterRole and WorkerNodeRole
This step is using AWS console (UI)
-
Search IAM service, click Roles on left-side dashboard
-
Click on create roles. Choose “Custom trust policy” then click next
-
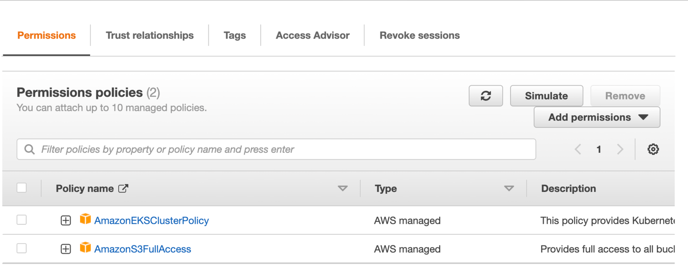
When creating MasterClusterRole, search for below and add it. then click on next and then further click on create role
-
AmazonEKSClusterPolicy
-
AmazonS3FullAccess
-
-
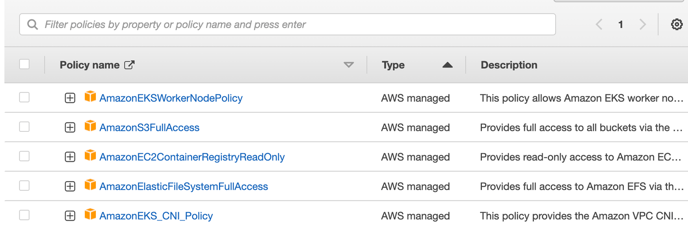
When creating WorkNodeRole, Search for below and add it. then click on next and then further click on create role
-
AmazonEKSWorkerNodePolicy
-
AmazonEC2ContainerRegistryReadOnly
-
AmazonElasticFileSystemFullAccess
-
AmazonEKS_CNI_Policy
-
AmazonS3FullAccess

-
-
The above 2 roles are used when creating EKS cluster (you can create Roles or use existing ones)
-
Step 3 - Create a EKS cluster
This step is using AWS console (UI)
-
Search of EKS in search bar.
-
Click Add Cluster
-
Cluster name, e.g. test-cluster, will be replaced by <cluster_name>
-
Cluster Service Role choose MasterClusterRole
-
-
Once cluster is up, under tab Configuration => Compute, click Add Node Group
-
Node IAM Role choose WorkerNodeRole
-
-
Export cluster kubeconfig in AWS CLI
-
Variables will need to export are:
-
<account_id> for example 2819177XXXXX
-
<cluster_name> is <name of the cluster that got created>
-
<config_name> is <any name for conifg>
-
<region> is < the region in which your cluster is>
-
-
Once you have all the above details go to AWS CLI and Run
aws eks --region ap-southeast-2 update-kubeconfig --name <cluster_name>
Expected Output:
Added new context arn:aws:eks:ap-southeast-2:<account_id>:cluster/<cluster_name> to ~/.kube/config
-
If you want to specify a config file other than default, add --kubeconfig <config_name>
-
aws eks --region ap-southeast-2 update-kubeconfig --name <cluster_name> --kubeconfig <config_name>
-
-
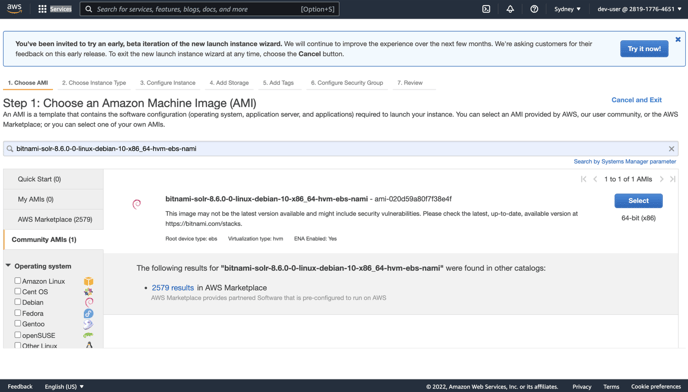
Step 4 - Install Solr VM
-
Create Solr
-
EC2 Launch instance, search for bitnami solr 8.6.0
- Add cores
- Login into Solr VM
- Download & copy cores folder
wget https://zetaris-download.s3.ap-southeast-2.amazonaws.com/solr/cores.tar
OR
From your local
scp cores.tar <VM-username>@<VM-public-ip>:/home/<VM-username>/

tar xf cores.tar
cp cores/ <path_to>/solr-8.6.0/server/solr/ - Start (or restart) solr
cd <path_to>/solr-8.6.0/bin
./solr start
-
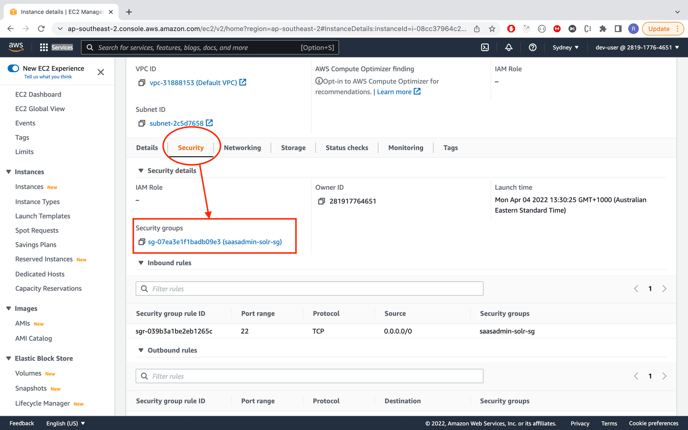
Use private ip address of Solr VM, and change it in server config, meta_store.properties
# solr server instance

solr_server=<private-ip-address>:8983/solr/ -
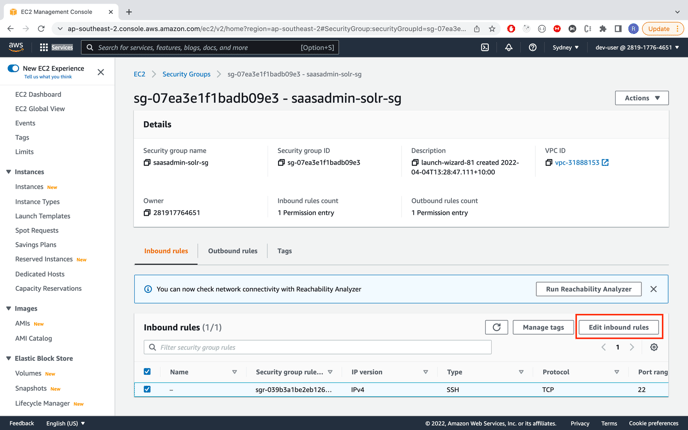
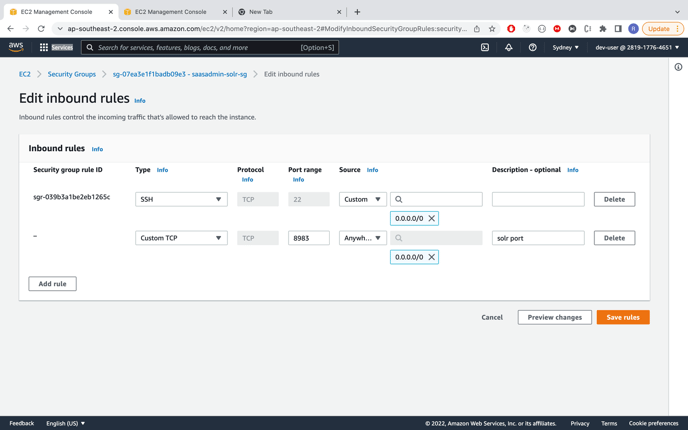
Open 8983 port of this solr VM by adding inbound rules in security group
-
Step 5 - Set up EFS
This step is to add persistent volumes for NDP server and gui.
Reference Amazon EFS CSI driver - Amazon EKS
-
Variables which are used in the step and might change as per the environment
-
<EFS_driver_policy> is AmazonEKS_EFS_CSI_Driver_Policy--> any name can be given in 2-b
-
<EFS_driver_role> is AmazonEKS_EFS_CSI_DriverRole--> any name can be given in 3-c-ii
-
<cluster name> --> your eks cluster name
-
<ID> --> OCID generated
-
<region> --> region of the EKS cluster
-
-
Create an IAM policy
-
Download the IAM policy document from GitHub
curl -o iam-policy-example.json https://raw.githubusercontent.com/kubernetes-sigs/aws-efs-csi-driver/v1.3.2/docs/iam-policy-example.json
-
Create the policy
aws iam create-policy \
--policy-name <EFS_driver_policy> \
--policy-document file://iam-policy-example.json
-
-
Create an IAM role and attach the IAM policy to it
-
Determine your cluster's OIDC provider URL.
aws eks describe-cluster --name <cluster-name> --query "cluster.identity.oidc.issuer" --output text
Output
-
https://oidc.eks.ap-southeast-2.amazonaws.com/id/EXAMPLEXXX45D83924220DC4815XXXXX
-
-
Create IAM role
-
Create a file called “trust-policy.json” using below code. Update account_id, OCID and region as per the project.
{
 "Version": "2012-10-17",
 "Statement": [
  {
   "Effect": "Allow",
   "Principal": {
    "Federated": "arn:aws:iam::<account_id>:oidc-provider/oidc.eks.ap-southeast-2.amazonaws.com/id/<EXAMPLEXXX45D83924220DC4815XXXXX>"
   },
   "Action": "sts:AssumeRoleWithWebIdentity",
   "Condition": {
    "StringEquals": {
     "oidc.eks.ap-southeast-2.amazonaws.com/id/<EXAMPLEXXX45D83924220DC4815XXXXX>:sub": "system:serviceaccount:kube-system:efs-csi-controller-sa"
    }
   }
  }
 ]
} -
Create the role
aws iam create-role \
 --role-name <EFS_driver_role> \
 --assume-role-policy-document file://"trust-policy.json"
-
-
Attach the IAM policy to the role.
aws iam attach-role-policy \
 --policy-arn arn:aws:iam::<account_id>:policy/<EFS_driver_policy> \
--role-name <EFS_driver_role> -
Create a Kubernetes service account that is annotated with the ARN of the IAM role that you created.
-
Create a file named efs-service-account.yaml. Update <account_id>,<EFS_driver_role>
---
apiVersion: v1
kind: ServiceAccount
metadata:
 name: efs-csi-controller-sa
 namespace: kube-system
 labels:
  app.kubernetes.io/name: aws-efs-csi-driver
 annotations:
  eks.amazonaws.com/role-arn: arn:aws:iam::<account_id>:role/<EFS_driver_role>
Then
kubectl --kubeconfig /path_to_config/<config_name> apply -f efs-service-account.yaml
-
-
-
Install the Amazon EFS driver
-
Add the helm repo & update helm
helm repo add aws-efs-csi-driver https://kubernetes-sigs.github.io/aws-efs-csi-driver/
helm repo update -
Install the chart.
helm --kubeconfig /path_to_config/<config_name> upgrade -i aws-efs-csi-driver aws-efs-csi-driver/aws-efs-csi-driver \
  --namespace kube-system \
  --set image.repository=602401143452.dkr.ecr.ap-southeast-2.amazonaws.com/eks/aws-efs-csi-driver
  --set controller.serviceAccount.create=false
  --set controller.serviceAccount.name=efs-csi-controller-sa
-
-
Create an Amazon EFS file system.
-
Get vpc_id and
vpc_id=$(aws eks describe-cluster \
 --name <cluster-name> \
 --query "cluster.resourcesVpcConfig.vpcId" \
--output text) -
Retrieve the CIDR range for your cluster's VPC and store it in a variable for use in a later step.
cidr_range=$(aws ec2 describe-vpcs \
 --vpc-ids $vpc_id \
 --query "Vpcs[].CidrBlock" \
--output text) -
Create a security group with an inbound rule that allows inbound NFS traffic for your Amazon EFS mount points.
-
Create a security group. give any group-name for example MyEfsSecurityGroup
security_group_id=$(aws ec2 create-security-group \
 --group-name MyEfsSecurityGroup \
 --description "My EFS security group" \
 --vpc-id $vpc_id \
--output text) -
Create an inbound rule that allows inbound NFS traffic from the CIDR for your cluster's VPC.
aws ec2 authorize-security-group-ingress \
 --group-id $security_group_id \ 3 --protocol tcp \
 --port 2049 \
 --cidr $cidr_range
-
-
Create an Amazon EFS file system for your Amazon EKS cluster.
-
Create a file system. Update you region
file_system_id=$(aws efs create-file-system \
 --region us-west-2 \
 --performance-mode generalPurpose \
 --query 'FileSystemId' \
--output text) -
Remember the file_system_id, it is later to be used.
echo $file_system_id
Output should be fs-abcdefgh
-
Create mount targets.
-
Determine the IP address of your cluster nodes.
kubectl --kubeconfig /path_to_config/<config_name> get nodes
-
Determine the IDs of the subnets in your VPC and which Availability Zone the subnet is in.
aws ec2 describe-subnets \
 --filters "Name=vpc-id,Values=$vpc_id" \
 --query 'Subnets[*].{SubnetId: SubnetId,AvailabilityZone: AvailabilityZone,CidrBlock: CidrBlock}' \
 --output table
-
-
Add mount targets for the subnets that your nodes are in. In below change subnet- example to subnet-id you got for the previous step. if you you got 10 subnet id run below command 10 times but putting each of the subnet-ID
aws efs create-mount-target \
 --file-system-id $file_system_id \
 --subnet-id subnet-EXAMPLEe2ba886490 \
 --security-groups $security_group_id
-
-
-
Deploy Persistent Volume Claim (Files should be attached)
-
For our gui and server deployment, we need in total 4 persistent volume claims, namely gui, server, data (customer data) and streaming.
-
Firstly, deploy the storage class.
kubectl --kubeconfig /path_to_config/<config_name> apply -f storageclass.yaml
-
Secondly, deploy the persistent volumes to be attached. Remember to edit/change all the files with the correct file_system_id which you got in above step.
kubectl --kubeconfig /path_to_config/<config_name> apply -f pv-data.yaml
kubectl --kubeconfig /path_to_config/<config_name> apply -f pv-gui.yaml
kubectl --kubeconfig /path_to_config/<config_name> apply -f pv-server.yaml
kubectl --kubeconfig /path_to_config/<config_name> apply -f pv-streaming.yaml
kubectl --kubeconfig /path_to_config/<config_name> apply -f pv-cache.yaml

OR

cd ../
kubectl --kubeconfig /path_to_config/<config_name> apply -f pvs -
Finally, deploy the persistent volume claims.
kubectl --kubeconfig /path_to_config/<config_name> apply -f claim-data.yaml
kubectl --kubeconfig /path_to_config/<config_name> apply -f claim-gui.yaml
kubectl --kubeconfig /path_to_config/<config_name> apply -f claim-server.yaml
kubectl --kubeconfig /path_to_config/<config_name> apply -f claim-streaming.yaml
kubectl --kubeconfig /path_to_config/<config_name> apply -f claim-cache.yaml

OR

cd ../
kubectl --kubeconfig /path_to_config/<config_name> apply -f claims -
Display persistent volumes and claims by
kubectl --kubeconfig /path_to_config/<config_name> get pv
kubectl --kubeconfig /path_to_config/<config_name> get pvc
-
-
Manually create an EC2 instance,
-
This step is for EFS system mounted.
-
Create an ubuntu VM
-
Go inside into the VM
chmod 600 xxx.pem
ssh -i xxx.pem ubuntu@<public_ip_address> -
Create a folder config for back-up
-
Create a folder mount for file system mounted
-
Create folders inside config folder, note that data, streaming & cache just keep them empty
- gui
- server
- data
- streaming
- cache -
Manually create files for gui config. You will get all the files in the attachment
Inside gui/conf folder.copy below files- application.conf- logback.xml- messages.en-AUInside gui/fluentd folder. copy below files- fluentlghtui.confInside /fluentd/conf.d folder. copy below files- status.conf- sessions.conf -
Manually create or copy files for server config
Inside /server/ copy below files- lightning-conf.xml- meta_store.properties- hive-site.xml- core-site.xml- config-client.xml- metrics.properties- log4j.properties- aws-bundle.jar -
Edit meta_store.properties and search for
-
this is the place where you will have to give database hostnamen,username and passowrd
-
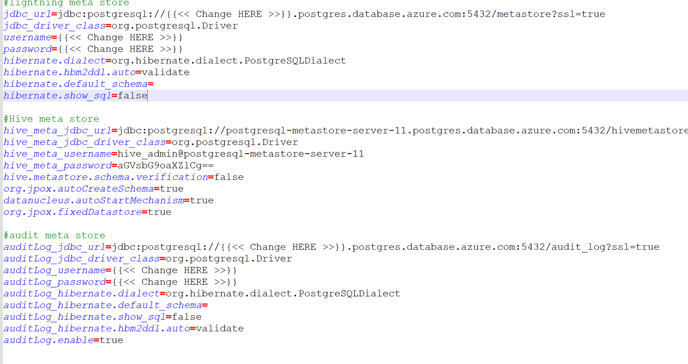
-
solr IP/hostname
-

-
-
Go to home dir/mount folder and mount file system.
-
To get <EFS_ip_address>
-
go to azure portal search for efs
-
find your file_system_id(this created in previous steps) and click on it.


-
click on on network tab. You will see all the <EFS_public_ip>
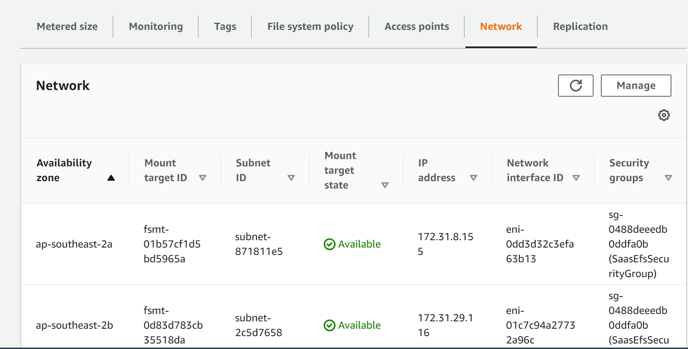
-
copy all the <EFS_public_ip> one by one in below command and run it. for example if you have 3 IP then you will have to run the below command 3 times.
cd ~
sudo apt update
sudo apt-get install nfs-common

sudo mount -t nfs -o nfsvers=4.1,rsize=1048576,wsize=1048576,hard,timeo=600,retrans=2,noresvport <EFS_ip_address>:/ ~/mount
-
-
-
copy content in config folder to mount founder
sudo cp -r config/* mount/
-
Step 5 - Install Zetaris
-
Install Spark Operator
-
Add repo spark-operator.
helm repo add spark-operator https://googlecloudplatform.github.io/spark-on-k8s-operator
-
Install helm chart.
helm --kubeconfig /path_to_config/<config_name> install spark-operator \
  spark-operator/spark-operator \
  --namespace spark-operator --create-namespace \
  --set webhook.enable=true \
  --set replicaCount=3 \
  --set leaderElection.lockNamespace=spark-operator \
  --version 1.1.6
-
-
Create service account - spark AND do the role binding to give proper permissions
-
spark service account should access s3, create a role using AWS console => IAM
-
Click Roles => Create Role => Choose Custom Trust Policy
-
Change policy content
{
    "Version": "2012-10-17",
    "Statement": [
        {
            "Effect": "Allow",
            "Principal": {
                "Federated": "arn:aws:iam::<ACCOUNT_ID>:oidc-provider/oidc.eks.<region-code>.amazonaws.com/id/<EXAMPLED539D4633E53DE1B716D3041E>"
            },
            "Action": "sts:AssumeRoleWithWebIdentity"
        }
    ]
} - <region-code> is ap-sooutheast-2 in our case
<EXAMPLED539D4633E53DE1B716D3041E> is 19637F061B8C25E63FF4DCXXXXXX - Attach Policy => Search AmazonS3FullAccess
-
Provide a name - e.g. EksS3FullAccessRole
- Click Create
- Create service aaccount - spark
Option 1 - use kubectl command
kubectl --kubeconfig /path_to_config/<config_name> create serviceaccount spark

kubectl --kubeconfig /path_to_config/<config_name> create clusterrolebinding spark-role \
  --clusterrole=edit --serviceaccount=default:spark --namespace=default

kubectl --kubeconfig /path_to_config/<config_name> annotate sa spark \
  eks.amazonaws.com/role-arn=arn:aws:iam::<ACCOUNT_ID>:role/<S3_access_role>
Remember to replace
<ACCOUNT_ID> is 2819177XXXXX
<S3_access_role> is EksS3FullAccessRole in this exampleOption 2 - use yaml
---
apiVersion: v1
kind: ServiceAccount
metadata:
  name: spark
  namespace: default
  annotations:
    eks.amazonaws.com/role-arn: arn:aws:iam::<ACCOUNT_ID>:role/<S3_access_role>
---
apiVersion: rbac.authorization.k8s.io/v1
kind: ClusterRoleBinding
metadata:
  name: spark-role
roleRef:
  apiGroup: rbac.authorization.k8s.io
  kind: ClusterRole
  name: edit
subjects:
  - kind: ServiceAccount
    name: spark
    namespace: default
-
-
Deploy secrets.
$ kubectl --kubeconfig /path_to_config/<config_name> apply -f secrets.yml
secret/workspace-secrets created-
workspace-secrets is used in both gui and server
-
run command to create docker secret to pull image from DockerHub
kubectl --kubeconfig /path_to_config/<config_name> \
  create secret docker-registry regcred \
  --docker-server=https://index.docker.io/v1/ \
  --docker-username=<your_username> \
  --docker-password=<your_password>

Output:
secret/regcred created
-
-
Add code related to persistent volumes into server yaml files.
-
Reference Running Spark on Kubernetes - Spark 3.2.1 Documentation
-
Apply this only to server yaml file
-
-
Deploy server and gui deployment yaml files
kubectl --kubeconfig /path_to_config/<config_name> apply -f lightning-gui-deployment.yaml
kubectl --kubeconfig /path_to_config/<config_name> apply -f lightning-server-deployment.yaml -
Install AWS Load Balancer controller
-
Reference this document to create load balancer Installing the AWS Load Balancer Controller add-on - Amazon EKS
-
-
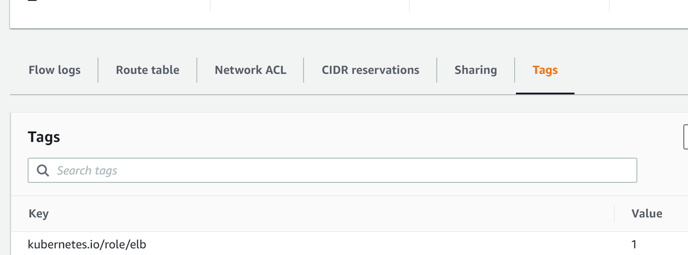
Add tags to related subnets inside VPC
Key – kubernetes.io/role/elb Value – 1
-
-
Click on your VPC
-

-
inside you VCP . Click on subnet
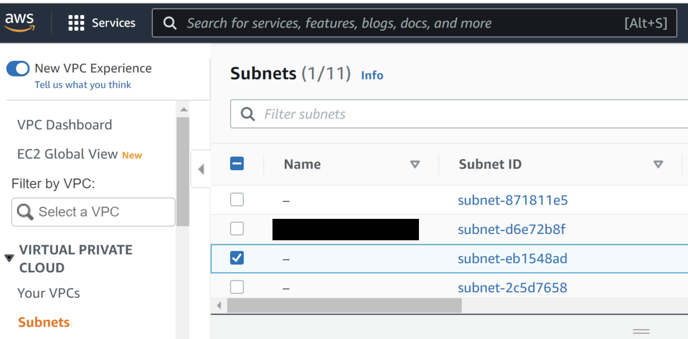
-
Click on all subnet_id one by . and click on tag tab at the bottom.
-
add tag Key – kubernetes.io/role/elb Value – 1
-
do this for all the subnet_id which are used above.
-

-
-
Key – kubernetes.io/cluster/<cluster_name> Value – shared
-
Click on your VPC
-

-
inside you VCP . Click on subnet
-
Click on all subnet_id one by . and click on tag tab at the bottom.
-
add tag kubernetes.io/cluster/<cluster_name> Value – shared
-
do this for all the subnet_id which are used above.
-
-
-
Deploy server and gui service yaml files
kubectl --kubeconfig /path_to_config/<config_name> apply -f lightning-gui-service.yaml
kubectl --kubeconfig /path_to_config/<config_name> apply -f lightning-server-service.yaml
Step 6 - Install AutoScaler inside Kubernetes
-
Add tags to our node group of cluster
In this example ***-test-3 cluster, we should click Configuration > Compute, then click the node group name ***-test-node-group
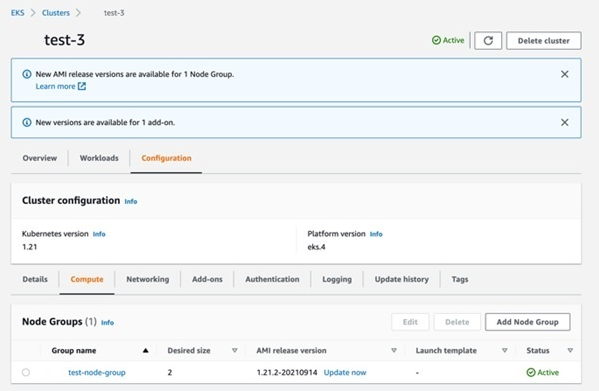
Click Edit button on the top-right of screen
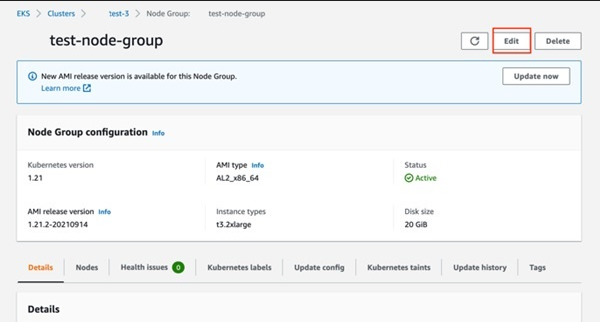
Add tags
-
Key – k8s.io/cluster-autoscaler/<my-cluster> Value – owned
-
Key – k8s.io/cluster-autoscaler/enabled Value – TRUE
Output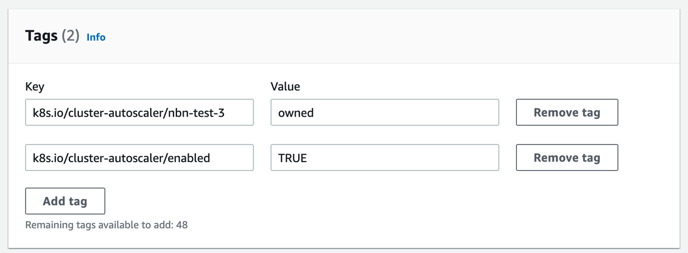
-
-
Create cluster autoscaler policy
-
Note that policy should be created once, if you have done this step for another cluster before, you can skip this step.
-
policy file (you can also find it in summary zip) - with name cluster-autoscaler-policy.json
{
 "Version": "2012-10-17",
 "Statement":
  {
   "Action": [
    "autoscaling:DescribeAutoScalingGroups",
    "autoscaling:DescribeAutoScalingInstances",
    "autoscaling:DescribeLaunchConfigurations",
    "autoscaling:DescribeTags",
    "autoscaling:SetDesiredCapacity",
    "autoscaling:TerminateInstanceInAutoScalingGroup",
    "ec2:DescribeLaunchTemplateVersions"
   ],
   "Resource": "*",
   "Effect": "Allow"
  }
 ]
} -
Create this policy - terminal should navigate to the enclosing folder, otherwise you have to provide full path
aws iam create-policy \
 --policy-name AmazonEKSClusterAutoscalerPolicy \
 --policy-document file://cluster-autoscaler-policy.json
If policy cannot be created, a policy named AmazonEKSClusterAutoscalerPolicy might already exist in your AWS, double check it from AWS console => IAM => Policies.
-
-
Create a Role based on autoscaler policy
-
Open the IAM console at https://console.aws.amazon.com/iam/.
-
In the left navigation pane, choose Roles. Then choose Create role.
-
In the Trusted entity type section, choose Web identity.
-
In the Web identity section:
-
For Identity provider, choose the URL for your Amazon EKS cluster.
If you do not know the url, go back to eks cluster and see Details > API server endpoint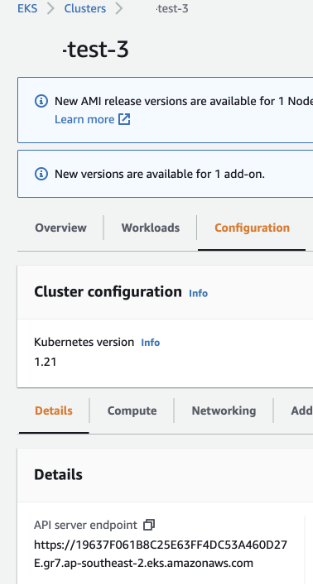
-
For Audience, choose sts.amazonaws.com.
-
-
Choose Next.
-
In the Filter policies box, enter AmazonEKSClusterAutoscalerPolicy. Then select the check box to the left of the policy name returned in the search.
-
Choose Next.
-
For Role name, enter a unique name for your role, such as AmazonEKSClusterAutoscalerRole.
-
For Description, enter descriptive text such as Amazon EKS - Cluster autoscaler role.
-
Choose Create role.
-
After the role is created, choose the role in the console to open it for editing.
-
Choose the Trust relationships tab, and then choose Edit trust policy.
-
Find the line that has sts content
"sts.amazonaws.com"
to the following"oidc.eks.<region-code>.amazonaws.com/id/<EXAMPLED539D4633E53DE1B716D3041E>:sub": "system:serviceaccount:kube-system:cluster-autoscaler"
<region-code> is ap-sooutheast-2 in our case
<EXAMPLED539D4633E53DE1B716D3041E> is 19637F061B8C25E63FF4DC53A460D27E -
Choose Update policy to finish.
-
-
Deploy Cluster Autoscaler
-
Download YAML file
This step can be skipped because file is included in zipcurl -o cluster-autoscaler-autodiscover.yaml https://raw.githubusercontent.com/kubernetes/autoscaler/master/cluster-autoscaler/cloudprovider/aws/examples/cluster-autoscaler-autodiscover.yaml
-
Modify YAML file
-
Change to your cluster name

-
Add more configuration under command (shown as blue indicators)
- --balance-similar-node-groups
- --skip-nodes-with-system-pods=false
- --scale-down-delay-after-add=3m
- --scale-down-unneeded-time=3m
- --scale-down-non-empty-candidates-count=3
- --scale-down-candidates-pool-ratio=0.4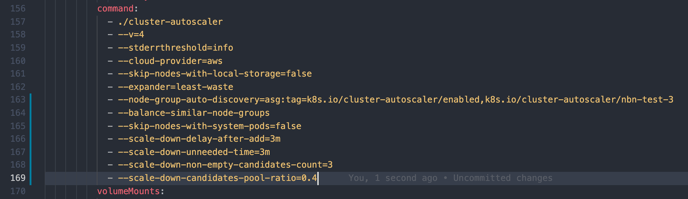
-
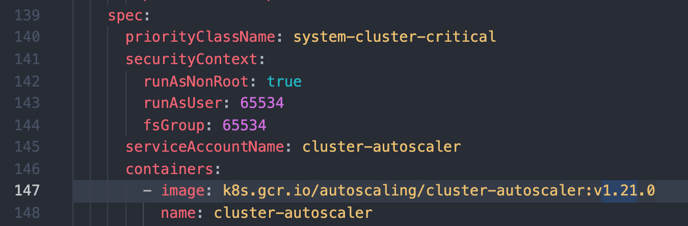
In this default YAML file line 147, it displays the default image to use (v1.21.0). Change it to your cluster version
-
Navigate to Releases · kubernetes/autoscaler
To see the latest release of v.1.21.x. put the latest number of x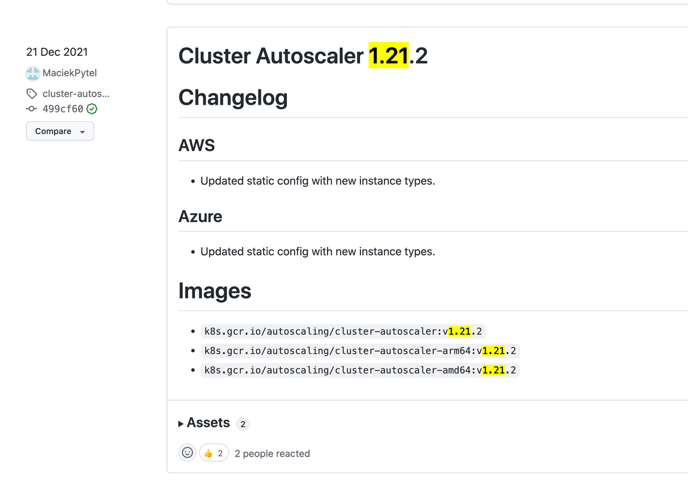
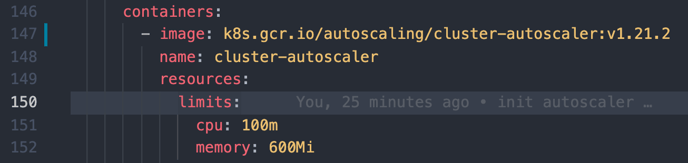
Change the image to v.1.21.2
-
-
Apply autoscaler yaml file
kubectl --kubeconfig /path_to_config/<config_name> apply -f cluster-autoscaler-autodiscover.yaml
-
Annotate service account to Cluster Role (created at previous step. Update your account_id before running it.
kubectl --kubeconfig /path_to_config/<config_name> \
 annotate serviceaccount cluster-autoscaler \
 -n kube-system \
 eks.amazonaws.com/role-arn=arn:aws:iam::<ACCOUNT_ID>:role/<AmazonEKSClusterAutoscalerRole>
<ACCOUNT_ID> is 2819177XXXX
<AmazonEKSClusterAutoscalerRole> is AmazonEKSClusterAutoscalerRole -
Patch the deployment to add the cluster-autoscaler.kubernetes.io/safe-to-evict annotation to the Cluster Autoscaler pods with the following command.
kubectl --kubeconfig /path_to_config/<config_name> \
 patch deployment cluster-autoscaler \
 -n kube-system \
 -p '{"spec":{"template":{"metadata":{"annotations":{"cluster-autoscaler.kubernetes.io/safe-to-evict": "false"}}}}}'
Installation is done, check the logs using the following command.
kubectl --kubeconfig /path_to_config/<config_name> \
 -n kube-system logs -f deployment.apps/cluster-autoscaler
Output
I0926 23:15:55.165842 1 static_autoscaler.go:138] Starting main loop
I0926 23:15:55.166279 1 utils.go:595] No pod using affinity / antiaffinity found in cluster, disabling affinity predicate for this loop
I0926 23:15:55.166293 1 static_autoscaler.go:294] Filtering out schedulables
I0926 23:15:55.166330 1 static_autoscaler.go:311] No schedulable pods
I0926 23:15:55.166338 1 static_autoscaler.go:319] No unschedulable pods
I0926 23:15:55.166345 1 static_autoscaler.go:366] Calculating unneeded nodes
I0926 23:15:55.166357 1 utils.go:552] Skipping ip-192-168-3-111.<region-code>.compute.internal - node group min size reached
I0926 23:15:55.166365 1 utils.go:552] Skipping ip-192-168-71-83.<region-code>.compute.internal - node group min size reached
I0926 23:15:55.166373 1 utils.go:552] Skipping ip-192-168-60-191.<region-code>.compute.internal - node group min size reached
I0926 23:15:55.166435 1 static_autoscaler.go:393] Scale down status: unneededOnly=false lastScaleUpTime=2019-09-26 21:42:40.908059094 ...
I0926 23:15:55.166458 1 static_autoscaler.go:403] Starting scale down
I0926 23:15:55.166488 1 scale_down.go:706] No candidates for scale down
-
Step 7: Creating an account on Lightning
-
Open terminal
-
Run command:
kubectl --kubeconfig /path to config/config_name exec -it thunderstorm-driver bash
-
Then run command:
cd /usr/share/zetaris/lightning/bin
- Once you are in the bin folder, run command
- modify dev.account.sh file
[Note: If you do not modify the dev.account.sh file the default credentials below should be used.]
printf "First Name\tSurname\tEmail\tTeam(org name)\tPassword\nDev,Account,dev@account.com,Account,password" >> $devOrg

Change to

printf "First Name\tSurname\tEmail\tTeam(org name)\tPassword\n{YOUR_FIRST_NAME},{YOUR_SURNAME},{YOUR_EMAIL},{YOUR_ORG_NAME},{YOUR_PASSWORD}" >> $devOrg

Note that YOUR_EMAIL is the admin level
./dev-account.sh
-
mod
- Once the site open login to it with credentials:
-
-
username → YOUR_EMAIL (by default → dev@account.com)
-
password → YOUR_PASSWORD (by default → password)
-
-
-
Create a new namespace, e.g. for pre-sales team & customer success team
kubectl --kubeconfig <your_config> create namespace pre-sales
kubectl --kubeconfig <your_config> create namespace customer-success -
Go back to Step 4 EFS
-
Repeat No.5 Create an Amazon EFS file system
-
Repeat No.6 Deploy Persistent Volume Claim
-
Skip the step of StorageClass because it is already inside cluster
-
For each persistent volume, give a specify name, not only the file name, but also the metadata name inside the file
pv-data-pre-sales.yaml
---
apiVersion: v1
kind: PersistentVolume
metadata:
 name: efs-pv-data-pre-sales
spec:
... -
For each claim, add namespace under metadata(Shown in line5), change volumeName as well
apiVersion: v1
kind: PersistentVolumeClaim
metadata:
 name: efs-claim-data
 namespace: pre-sales
spec:
 ...
 volumeName: efs-pv-data-pre-sales
-
-
Repeat No.7 Volume mount
-
You do not have to spin up another VM
-
create an empty folder /mount-pre-sales(or choose any name for the folder)
cd ~
sudo mount -t nfs -o ... <new_EFS_ip_address>:/ ~/mount-pre-sales
sudo cp -r config/* mount-pre-sales/
-
-
-
Repeat Step 5 Zetaris Installation
-
Skip #1 Spark Operator & #6 Load Balancer  add taf
-
Specify namespace before create Service Account & Secret
# Service Account
kubectl create serviceaccount spark --namespace=pre-sales
# Role binding
kubectl create clusterrolebinding spark-role \
 --clusterrole=edit --serviceaccount=pre-sales:spark --namespace=pre-sales


apiVersion: v1
kind: Secret
metadata:
 name: acssecret
 namespace: pre-sales
....


apiVersion: v1
kind: Secret
metadata:
 name: workspace-secrets
 namespace: pre-sales
.... -
Specify namespace for deployment & service as well
# GUI
---
apiVersion: apps/v1
kind: Deployment
metadata:
 name: thunderstorm-gui
 namespace: pre-sales
 labels:
  app: thunderstorm-gui
...

---
apiVersion: v1
kind: Service
metadata:
 name: gui-service
 namespace: pre-sales
...
# Server
---
apiVersion: sparkoperator.k8s.io/v1beta2
kind: SparkApplication
metadata:
name: thunderstorm
namespace: pre-sales
...
---
apiVersion: v1
kind: Service
metadata:
name: thunderstorm << OR >> thunderstorm-rest
namespace: pre-sales
...
-
-
Prerequisite step--> Postgres installation:
-
-
-
login to amazon
-
search for RDS. Click on create database button.
-
choose
-
Database creation method:standard database
-
Engine option : postgreSQL
-
version : 11
-
template : production
-
database name : any name
-
master usenrame : postgres
-
password : your password
-
confirm password : your password
-
public access (by default it is private)
-
-
Click Create database button
-
Create database and tables
-
once the connection to database is made create 2 databases
CREATE DATABASE metastore;
CREATE DATABASE audit_log;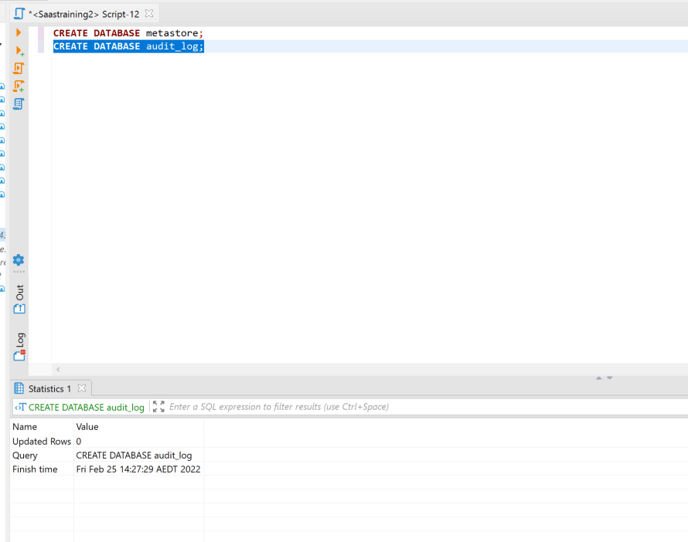
-
Now connect to metastore database
-
Execute the the sql statements(metastore queries attached below)
-

-
-
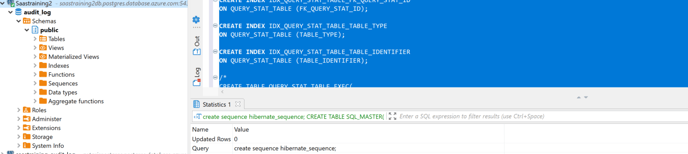
Now connect to audit_log database
-
Execute the the sql statements(audit_log queries attached below)
-
-
-
-
-