Zetaris provides access to your ElasticSearch repository through JDBC. The following guide will guide you in establishing a live connection to Zetaris.
Connect to ElasticSearch via NDP Fabric Builder
Connect to ElasticSearch via SQL Editor
Requirements
- ElasticSearch JDBC Driver
Install ElasticSearch JDBC Driver
The ElasticSearch JDBC Driver (.jar file) needs to be uploaded to the Zetaris JDBC Library. This can be done using the following steps.
The exact location of the JDBC library folder might differ slightly depending on how Zetaris has been installed (kubernetes, non-default etc.)
Step 1: Download the ElasticSearch JDBC Driver
Step 2: Call your Zetaris JDBC Library from the terminal/command line
/home/zetaris/lightning-server/jdbc-lib/
Step 3: Paste the ElasticSeach JDBC Driver in the jdbc-lib/ folder
Connect to ElasticSearch via NDP Fabric Builder
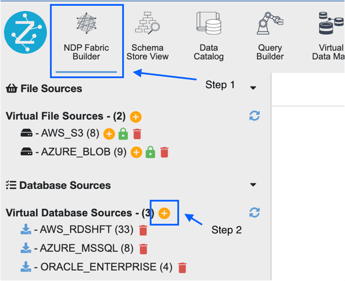
Step 1: Click the Data Fabric Builder icon.
Step 2: Under Database Sources click the '+' next to Virtual Database Source to launch the wizard.
Step 3: When the GUI wizard launches accept the defaults and click Next.
Step 4: Specify the following values for the connection:
| Parameter | Value |
| Datasource | Other JDBC |
| Data Source Name |
create a name for the new connection NOTE: name cannot contain spaces |
| JDBC Driver Class | org.elasticsearch.xpack.sql.jdbc.EsDriver |
| JDBC URL |
jdbc:es://{host}:{port}/ Default Port: 9200 |
| Username |
{elasticsearch username} |
| Password |
{elasticsearch passord} |
Additional Parameters
Other additional connection parameters can be included, check the ElasticSearch documentation for information on the exact string detail required. These additional fields include:
- Timezone
- SSL
- Network (connection and query timeout, page size)
- Proxy
- Mapping
- Index (default false)
- Cluster
- Error Handling
- Troubleshooting
Click 'Next'
Step 5: Select the tables you wish to include, or tick the top box for wildcard inclusion that will include all tables, and register further tables once the connection has been made.
Click 'Next'
Step 6: Review and Connect. Once connected your datasource will appear on the left hand-side in your Virtual Database Source connection list.
Connect to ElasticSearch via SQL Editor
Example connection string below:
CREATE DATASOURCE ELASTICSEARCH OPTIONS (
  jdbcdriver "oorg.elasticsearch.xpack.sql.jdbc.EsDriver",
  jdbcurl "jdbc:es://myelasticsearch.repository:9200",
  username "admin",
  password "password"
);

REGISTER DATASOURCE TABLES FROM ELASTICSEARCH;