
Zetaris uses a virtualisation-first approach to data connectivity. Rather than copying or moving data, Zetaris registers the metadata of each source and queries it in place. Your data stays where it lives while Zetaris provides a unified view across all of it.
Data Source Types
Zetaris supports six categories of data source. On the Home page, click Register Data Source to see all of them (you can also use the + button at the top of Data Explorer).
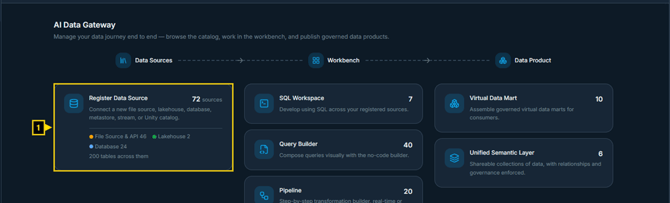
Register Data Source on the Home page
• File Source & API: CSV, JSON, XML, Parquet, ORC, Delta or Avro files on Amazon S3, Azure Blob Storage, Google Cloud Storage, the NDP File System or local storage, and REST API endpoints.
• Lakehouse: create an Apache Iceberg lakehouse backed by cloud storage.
• Database: any JDBC database, including PostgreSQL, MySQL, Oracle, SQL Server, MariaDB, Snowflake, Redshift, BigQuery and Databricks.
• Meta Store: register a Hive Metastore or an AWS Glue catalog.
• Streaming: register a Kafka topic or a streaming file source.
• Unity Catalog: register an external Databricks Unity Catalog.
Connecting a File Source or REST API
A file source is a container (a virtual database) for the tables you register from files or API endpoints.
1. On the Register Data Source page, click File Source & API.
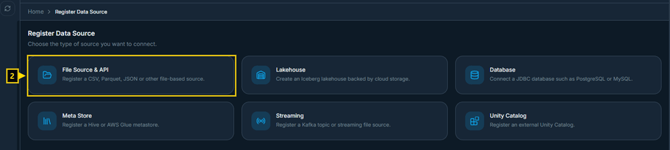
File Source & API
2. Enter a Database Name (e.g. public_demo) and an optional Description. Add Additional Parameters if needed (format, header, delimiter).
3. Click Create.
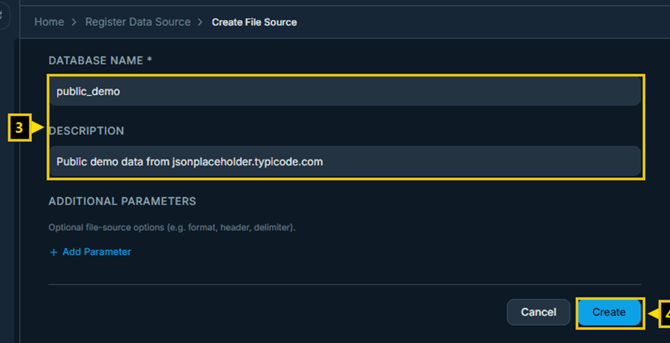
Create File Source
4. The new source appears in Data Explorer under File Source & API. Open it and click Create Table.
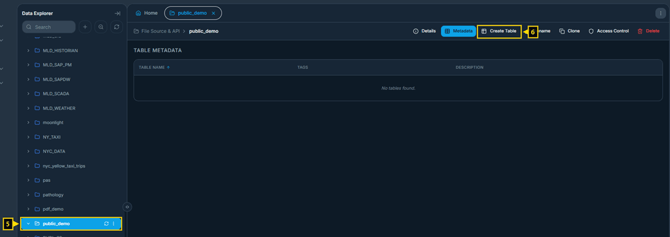
The new file source and Create Table
5. Under Source Type, select File store to register a file, or API to retrieve data from a REST endpoint. Click Next.
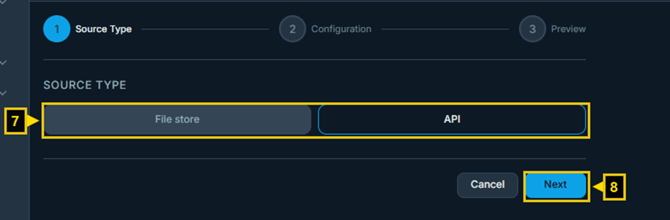
Choose the source type
API tables
6. Enter a Table Name and the End Point URL (e.g. https://jsonplaceholder.typicode.com/users).
7. Select the Method, HTTP Encoding and Response Type.
8. If the API needs it, add Request, Header or Body parameters (e.g. Authorization: Bearer <token>) or select an OAuth profile (managed under Management > OAuth). Use Test to check the call.
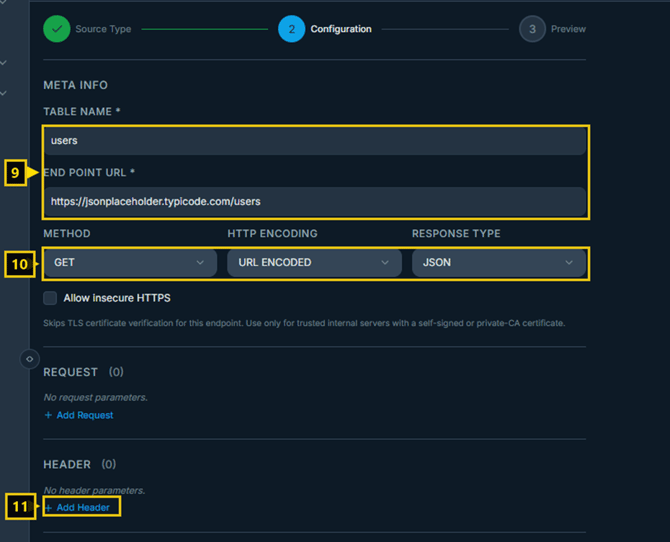
API table configuration
9. Click Next to preview the response, then click Create.
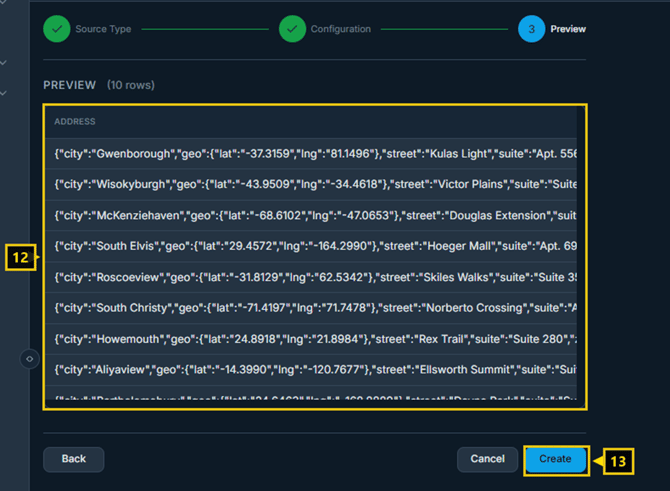
Preview and create
10. The table appears under the source in Data Explorer. Open it and click Preview to see the data.
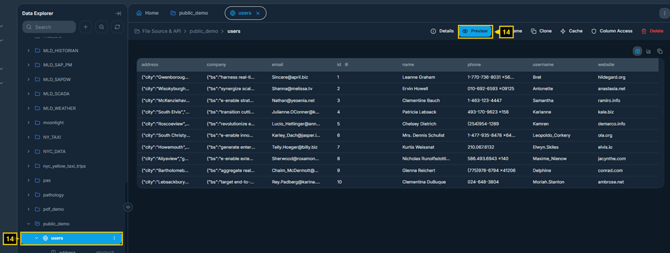
The registered API table
File tables
1. Select the File Format (CSV, JSON, XML, Parquet, ORC, Delta or Avro) and the Storage Provider (Amazon S3, Azure Blob Storage, Google Cloud Storage, NDP File System or Local Storage).
2. Enter the Table Name and the File Path (e.g. s3a://<bucket>/<path>/orders.csv).
3. Enter the storage credentials for the provider (for Amazon S3: Endpoint, Access Key, Security Key, Session Token), the Delimiter and any Additional Parameters. Then click Next, review the preview and click Create.
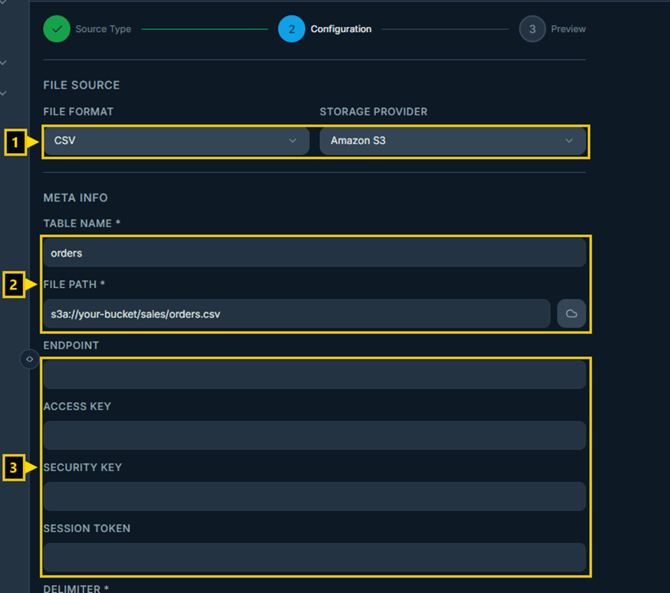
File table configuration
Connecting a Database
Database connections use a four-step wizard: Source Type, Connection, Select Tables and Register.
Step 1 — Source Type
1. Select the Database Type: PostgreSQL, MySQL, Oracle, SQL Server, MariaDB, Snowflake, Redshift, BigQuery, Databricks or Other.
2. Enter a Database Source Name.
3. Click Next.
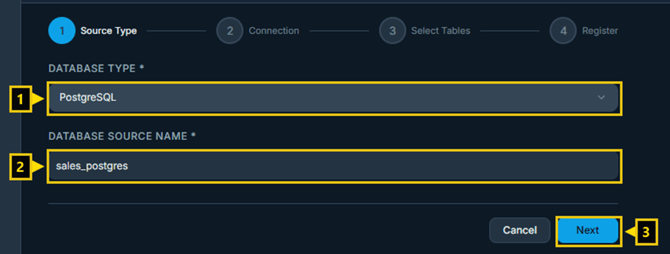
Database: source type
Step 2 — Connection
4. Enter the JDBC URL (e.g. jdbc:postgresql://<host>:5432/<database>). The JDBC Driver is filled in for the selected type.
5. Enter the Username and Password.
6. Adjust the Fetch Size if needed and add Additional Parameters (e.g. schema, ssl).
7. Click Next.
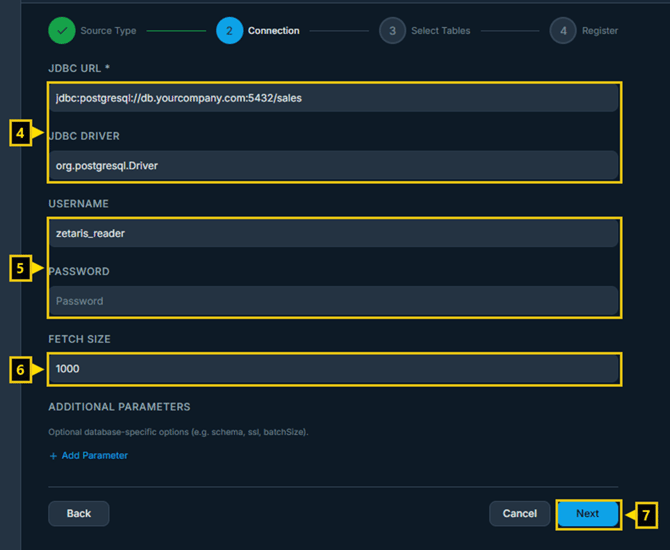
Database: connection
Step 3 — Select Tables
Browse the schemas and tables of the connected database and select the tables to register as virtual tables. Click Next.
Step 4 — Register
Review the summary of the connection and selected tables, then click Register. The tables appear in Data Explorer under Database.
Creating a Lakehouse
1. On the Register Data Source page, click Lakehouse.
2. Enter a Name for the lakehouse.
3. Select the Storage Type (e.g. AWS S3) and enter the Storage Path (format: s3a://<bucket-name>/<directory>).
4. Enter the cloud credentials: Access Key, Secret Key and, optionally, a Session Token and custom Endpoint.
5. Click Create.
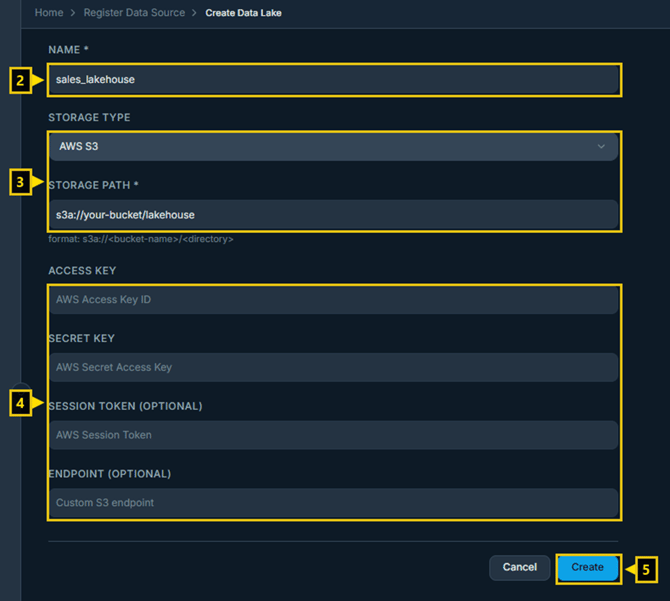
Create Data Lake
Once created, you can manage Iceberg tables directly within Zetaris.
Registering a Meta Store
Meta Store registration uses a three-step wizard: Type, Connection and Select Databases.
1. On the Register Data Source page, click Meta Store.
2. Select Hive Metastore (JDBC-based) or AWS Glue (AWS-managed catalog).
3. Click Next, enter the connection details (JDBC URL and credentials for Hive, or the AWS region and credentials for Glue), then select the databases to import and click Register.
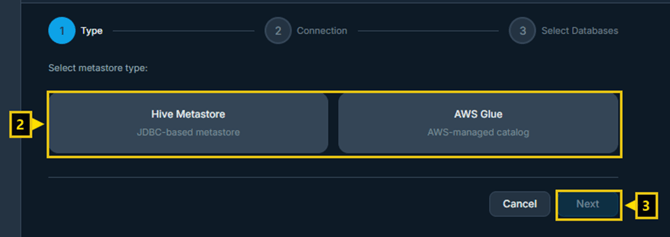
Register Meta Store
Imported table definitions appear in Data Explorer under Meta Store. No data is copied — Zetaris queries the original tables through the metastore.
Connecting Streaming Sources
Streaming registration uses a two-step wizard: Basic info and Source.
1. On the Register Data Source page, click Streaming.
2. Enter a Name (letters, numbers and underscore only).
3. Select the Input format: JSON, CSV or OTHER. Leave Infer schema on unless the backend should reuse a stored schema.
4. Paste an Input sample (one or more sample rows used to infer or validate the schema).
5. Click Next to configure the source (e.g. Kafka broker and topic), then register it.
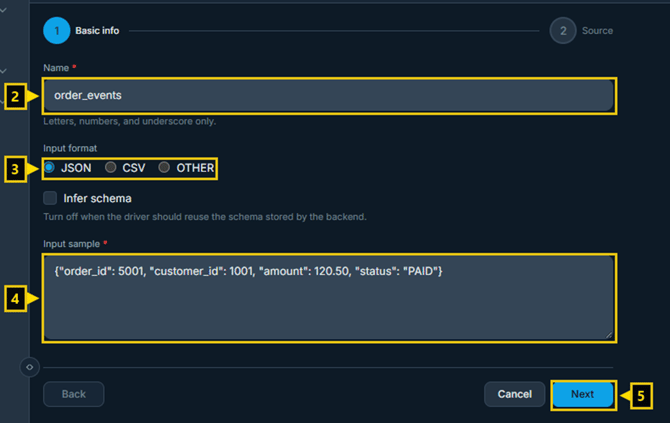
Register streaming source
Registered streaming sources can be queried alongside batch data using standard SQL.
Connecting Unity Catalog
1. On the Register Data Source page, click Unity Catalog.
2. Enter a Catalog Alias Name, the Catalog Name and the URI of the Unity Catalog server.
3. Optionally add a Token, and tick Use Static Credentials if required.
4. Click Register.
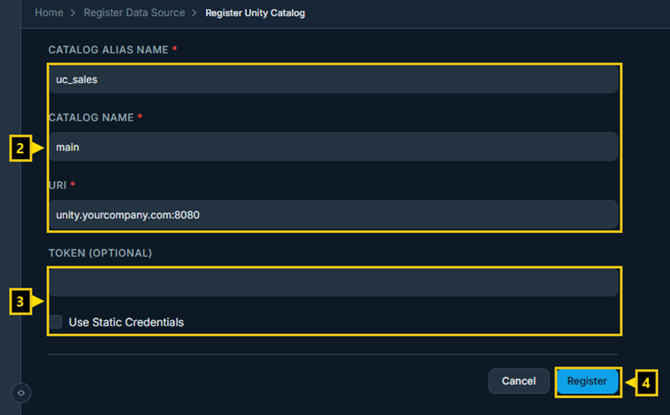
Register Unity Catalog
Tables from the catalog then appear as virtual tables in Zetaris and can be queried alongside any other registered source.
Registering sources with SQL
Sources and tables can also be registered in bulk in Workbench > SQL Workspace, for example:
CREATE DATASOURCE pg_sales DESCRIBE BY "Sales Postgres" OPTIONS (
jdbcdriver "org.postgresql.Driver",
jdbcurl "jdbc:postgresql://<host>:5432/sales",
username "<username>", password "<password>"
);
REGISTER DATASOURCE TABLES FROM pg_sales;
Key Concepts Virtualisation
Zetaris does not move or duplicate your data. It registers metadata and queries the source directly. This removes the need for data pipelines on read operations and ensures you always work with current data.
Data Explorer
The Data Explorer panel on the left shows all registered sources grouped by type. Expand any source to browse its tables and columns. Use Search to locate tables across sources.
Virtual Tables
Once a data source is registered, its tables appear as virtual tables in the Zetaris query engine. They can be joined, filtered and combined with tables from any other registered source using standard SQL.