Please follow the below prerequisites and deployment instructions to deploy Zetaris on EKS environment.
Prerequisites:
You can ensure the CLI environment to run the helm and kubectl command. Either it can be on AWS Cloud Shell OR Local CLI (Shell, CMD or PowerShell)
- Helm
https://helm.sh/docs/intro/install/
- Kubectl CLI
https://kubernetes.io/docs/tasks/tools/#kubectl
- AWS CLI
- Configure AWS Credentials using “aws configure” OR “aws configure sso”
https://docs.aws.amazon.com/cli/latest/reference/configure/
https://medium.com/@pushkarjoshi0410/how-to-set-up-aws-cli-with-aws-single-sign-on-sso-acf4dd88e056
- DBeaver Installation OR "postgres DB cli"
This product requires an internet connection to deploy properly. The following packages are downloaded on deployment.
This product is going to be hosted on secure a virtual private cloud network.
If pre-requisites installation are failed, please don't continue to do further installation. You can reach out to Zetaris support team.
If you get stuck on the helm installation or missed any steps, please don't continue to do further steps. Please reach out to Zetaris support team.
Deployment Instructions:
1). Deploy the below CloudFormation template on your AWS account. Update require parameters such as KeyName, DBUsername, DBPassword..etc
https://zetarislogo.s3.ap-southeast-2.amazonaws.com/aws+zetaris.json
Creating a new Cloudformation stack
Sign in to the AWS Management Console and open the AWS CloudFormation console at https://console.aws.amazon.com/cloudformation.
Choose Create Stack.
In the Specify template section, select Amazon S3 Template URL and then choose Next:
https://zetarislogo.s3.ap-southeast-2.amazonaws.com/aws+zetaris.json
In the Specify stack details section, enter a name in the Stack name field. For this example, use ZetarisStack. The stack name can't contain spaces.
In the Parameters section, you ensure to fill all the values for all parameters including DBUsername, DBPassword, and KeyName. In the KeyName field, enter the name of a valid Amazon EC2 pair in the same region you are creating the stack.
Choose Next.
In this scenario, we won't add any tags. Choose Next. Tags, which are key-value pairs, can help you identify your stacks.
Review the information for the stack. When you're satisfied with the settings, choose Submit.
2). Follow the instructions to add an OIDC provider for your cluster.
https://docs.aws.amazon.com/eks/latest/userguide/enable-iam-roles-for-service-accounts.html
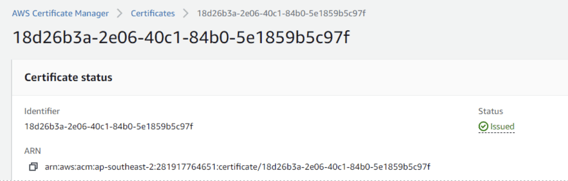
3). Request for a public certificate for fully qualified domains from Zetaris and email us for approval.
(i.e)
uitest.enterprise.zetaris.com
apitest.enterprise.zetaris.com
airflow.enterprise.zetaris.com
privateai.enterprise.zetaris.com
avatar.enterprise.zetaris.com
zeppelin.ui.enterprise.zetaris.com
opensearchdb.enterprise.zetaris.com
opensearch.enterprise.zetaris.com
Note the domain names and the cert ARN once its issued.
(i.e)
4). Connect your EKS cluster and ensure the nodes are in ready state.
aws eks --region <region-code> update-kubeconfig --name <cluster_name>
https://medium.com/@kevken1000/eks-connecting-to-the-cluster-3c20e0e39a0f
5). Create service account for AWS Load balancer controller.
Replace the AWS ID with your AWS ID
cat >aws-load-balancer-controller-service-account.yaml <<EOF
apiVersion: v1
kind: ServiceAccount
metadata:
  labels:
    app.kubernetes.io/component: controller
    app.kubernetes.io/name: aws-load-balancer-controller
  name: aws-load-balancer-controller
  namespace: kube-system
  annotations:
    eks.amazonaws.com/role-arn: arn:aws:iam::281917764651:role/aws-load-balancer-controller
EOF
kubectl apply -f aws-load-balancer-controller-service-account.yaml
helm repo add eks https://aws.github.io/eks-charts
helm repo update eks
helm install aws-load-balancer-controller eks/aws-load-balancer-controller \
  -n kube-system \
  --set clusterName=Zetaris \
  --set serviceAccount.create=false \
  --set serviceAccount.name=aws-load-balancer-controller
kubectl get deployment -n kube-system aws-load-balancer-controller
Helm
curl -fsSL https://raw.githubusercontent.com/helm/helm/main/scripts/get-helm-3 | bash
3. Setup the ‘namespaces’
· Login to OpenShift / Kubernetes cluster using kubeadmin credentials from oc/kubectl command line tool.
kubectl create namespace zetaris
kubectl create namespace airflow
Set the below variables for the current version release in your terminal.
Please contact Zetaris for the token below
$zettoken=github_pat_XXXXXXX
$zetrelease=helm_latest
Set the env value to reflect the Infrastructure provider
like 'aws', 'azure', 'ibm', 'gcp', 'dell', 'hitachi', 'local' (minikube)
$environment=local
Postgres installation
Please install Postgres external using the below two option
A).Postgres on external source like RDS or other managed services. Go with the low cost one like Azure flexible server, AWS Aurora postgres..etc
OR
B) .Postgres on k8s inside the cluster.
Run “kubectl get sc” to confirm the storage class
Set appropriate “storageClassName”. “kubectl get sc”
$storageclass=default
helm repo add helm-postgres https://$zettoken@raw.githubusercontent.com/zetaris/openshift/$zetrelease/postgres
helm upgrade --install postgres \

helm-postgres/postgres --namespace zetaris \

--set storageClassName=$storageclass \

--set environment=$environment
List out all generated pods
kubectl get pods -n zetaris
Get the pod name of postgres
kubectl exec -it <postgres pod name> -n zetaris -- /bin/sh
su - postgres
The below command would ask password and enter “<Your Choice Password>”
psql -h postgres -U rds_admin postgres
create database metastore;
create database auditlog;
create database airflowdb;
5. Install the Spark Operator and Opensearch
· Add the spark operator, cert repo;
helm repo add spark-operator https://kubeflow.github.io/spark-operator

helm repo add jetstack https://charts.jetstack.io
helm repo update
· Install the spark operator , cert manager;
helm upgrade --install spark-operator spark-operator/spark-operator --namespace spark-operator --create-namespace --version=1.2.15 --set webhook.enable=true
kubectl label namespace cert-manager certmanager.k8s.io/disable-validation=true
kubectl create ns cert-manager


helm install cert-manager jetstack/cert-manager --namespace cert-manager --version v1.7.0 --set installCRDs=true
Install the opensearch;
Option 1: Using helm charts
helm uninstall opensearch -n zetaris
helm repo add opensearch https://opensearch-project.github.io/helm-charts/
helm upgrade --install opensearch opensearch/opensearch --namespace zetaris --set image.tag=2.11.0 --set serviceAccount.name=zetaris-sa
Option 2: Using git repo
git clone https://github.com/zetaris/opensearch.git
helm uninstall opensearch -n zetaris
helm upgrade --install opensearch opensearch/hitachi --namespace zetaris --set image.tag=2.11.0 --set serviceAccount.name=zetaris-sa
6. Lightning Deployments
Add below helm repos,
helm repo add helm-zetaris-lightning-solr https://$zettoken@raw.githubusercontent.com/zetaris/HelmDeployment/$zetrelease/solr/helm/
helm repo add helm-zetaris-lightning-server https://$zettoken@raw.githubusercontent.com/zetaris/zetaris-lightning/$zetrelease/deployments/helm/
helm repo add helm-zetaris-lightning-api https://$zettoken@raw.githubusercontent.com/zetaris/lightning-api/$zetrelease/deployments/helm/
helm repo add helm-zetaris-lightning-gui https://$zettoken@raw.githubusercontent.com/zetaris/lightning-gui/$zetrelease/deployments/helm/
helm repo add helm-zetaris-lightning-zeppelin https://$zettoken@raw.githubusercontent.com/zetaris/zetaris-zeppelin/$zetrelease/deployments/helm/
helm repo add helm-zetaris-digiavatar https://$zettoken@raw.githubusercontent.com/zetaris/digiavatar/$zetrelease/deployments/helm/
helm repo add helm-zetaris-privateai https://$zettoken@raw.githubusercontent.com/zetaris/privateai/$zetrelease/deployments/helm/
helm repo add helm-zetaris-airflow-ing https://$zettoken@raw.githubusercontent.com/zetaris/HelmDeployment/$zetrelease/airflow-ing/helm/
Replace the below values and apply helm install,
Update image and domain configs.
serverImage=zetregistry.azurecr.io/lightning-server:v2.4.1.0-latest

apiImage=zetregistry.azurecr.io/lightning-api:v2.4.1.0-latest

guiImage=zetregistry.azurecr.io/lightning-gui:v2.4.1.0-latest

computesparkimage=zetregistry.azurecr.io/lightning-server:v2.4.1.0-latest

computeprestoimageRepo=zetregistry.azurecr.io/lightning-presto-app

computeprestoimageTag=zv2.4.1.0-latest

zeppelinImage=zetregistry.azurecr.io/lightning-zeppelin-app:zv2.4.1.0-latest
Update postgres details here,
dbdns=postgres

dbport=5432

metadb=metastore

auditdb=audit_log

dbuser=rds_admin

dbpwd=<Your chosen password in Step 4>

sslmode=require

metastoreJdbcUrl="jdbc:postgresql://$dbdns:$dbport/$metadb?user=$dbuser&password=$dbpwd&sslmode=$sslmode"

auditLogJdbcUrl="jdbc:postgresql://$dbdns:$dbport/$auditdb?user=$dbuser&password=$dbpwd&sslmode=$sslmode"
For AWS EFS as storage
awsefsid="". <EFS Name>

awsefsdata="" <EFS Access Point  -create for data>

awsefszeppelin="". <EFS Access Point  -create for Zeppelin with 1001 and 0777 permission>

tls_cert_arn="" <Available from Cert Manager once certs are ready>
Set the protocol (In case the customer wants to proceed without certificate then)
dnsprotocol=http
For guidance on creating public and private keys, please refer to the following resource: https://stackoverflow.com/questions/44474516/how-to-create-public-and-private-key-with-openssl.
openssl genpkey -algorithm RSA -out private_key.pem -pkeyopt rsa_keygen_bits:2048
openssl rsa -pubout -in private_key.pem -out public_key.pem
openssl rsa -in private_key.pem -outform DER -out private_key.der
openssl rsa -in private_key.pem -pubout -outform DER -out public_key.der
base64 private_key.der > private_key_der.txt
base64 private_key.der > private_key_der.txt
privateKeyDer=$(openssl rsa -in private_key.pem -outform DER | base64 -w0)

publicKeyDer==$(openssl rsa -in private_key.pem -pubout -outform DER | base64 -w0)
Lightning solr deployment
helm upgrade --install lightning-solr \
helm-zetaris-lightning-solr/solr \
--namespace zetaris \
--set storageClassName=$storageclass \
--set environment=$environment
Lightning server deployment
helm upgrade --install lightning-server \
helm-zetaris-lightning-server/lightning-server \
--namespace zetaris \
--set db.metastore.jdbcUrl=$metastorejdbcUrl \
--set db.auditLog.dbcUrl=$auditLogjdbcUrl \
--set storage.storageClass.name=$storageclass \
--set environment=$environment \
--set encryption.privateKeyDer=$privateKeyDer \
--set encryption.publicKeyDer=$publicKeyDer \
--set storage.aws.efs.id=$awsefsid \
--set storage.aws.efs.data=$awsefsdata \
--set serverImage=$serverImage \
--set storage.storageClass.create=false \
--set storage.aws.efs.driver=efs.csi.aws.com
Lightning API deployment
helm upgrade --install lightning-api \
helm-zetaris-lightning-api/lightning-api \
--namespace zetaris \
--set environment=$environment \
--set apiImage=$apiImage \
--set ingress.protocol=$dnsprotocol \
--set aws.ingress.tls_cert_arn=$tls_cert_arn \
--set ingress.baseDomain=$basednsname \
--set db.metastore.jdbcUrl=$metastorejdbcUrl \
--set db.auditLog.jdbcUrl=$auditLogjdbcUrl \
--set compute.spark.image=$computesparkimage \
--set compute.presto.imageRepo=$computeprestoimageRepo \
--set compute.presto.imageTag=$computeprestoimageTag
Lightning GUI deployment
helm upgrade --install lightning-gui \
helm-zetaris-lightning-gui/lightning-gui \
--namespace zetaris \
--set guiImage=$guiImage \
--set ingress.protocol=$dnsprotocol \
--set aws.ingress.tls_cert_arn=$tls_cert_arn \
--set ingress.baseDomain=$basednsname \
--set environment=$environment
Lightning Zeppelin deployment
helm upgrade --install lightning-zeppelin \
helm-zetaris-lightning-zeppelin/lightning-zeppelin \
--namespace zetaris \
--set ingress.protocol=$dnsprotocol \
--set ingress.baseDomain=$basednsname \
--set ingress.aws.tls_cert_arn=$tls_cert_arn \
--set storage.storageClass.name=$storageclass \
--set environment=$environment \
--set storage.aws.efs.id=$awsefsid \
--set storage.aws.efs.zeppelin=$awsefszeppelin \
--set zeppelin.image=$zeppelinImage
Digiavatar deployment
helm upgrade --install digiavatar helm-zetaris-digiavatar/digiavatar --namespace zetaris \
--set ingressprotocol=$dnsprotocol --set ingress.baseDomain=$basednsname \
--set environment=$environment \
--set serviceaccount=zetaris-sa
Private AI deployment
efsDriver=efs.csi.aws.com
efsAccesspointPrivateai= <Access Point ID from EFS Instance for PrivateAI>
helm upgrade --install privateai helm-zetaris-privateai/privateai --namespace zetaris \
--set ingress.baseDomain=$basednsname \
--set ingressprotocol=$dnsprotocol \
--set environment=$environment \
--set gpuenabled=false \
--set storageclass=$storageclass \
--set serviceaccount.name=zetaris-sa \
--set ingress.aws.tls_cert_arn=$tlsCertArn \
--set aws.efs.id=$efsId \
--set aws.efs.driver=$efsDriver \
--set aws.efs.privateai=$efsAccesspointPrivateai
Airflow Deployment
efsAccesspointDags= <Access Point ID from EFS Instance for Airflow>
helm upgrade --install airflow-ing \
helm-zetaris-airflow-ing/airflow-ing \
--namespace airflow \
--set environment=$environment \
--set storage.aws.efs.id=$efsId \
--set storage.aws.efs.driver=$efsDriver \
--set storage.aws.efs.data=$efsAccesspointDags \
--set ingress.baseDomain=$basednsname \
--set ingress.aws.tls_cert_arn=$tlsCertArn \
--set  aws.dataVolume=pv-dags-aws
Final deployment should contain running pods as shown below;
NAME                                                  READY   STATUS             RESTARTS       AGE
digiavatar-5f69b44d68-w2tfs                           1/1     Running            0              12h
lightning-api-988b7cbb6-nhwnk                         1/1     Running            0              12h
lightning-gui-7f9b6bbb4d-h52bn                        1/1     Running            0              179mlightning-server-5439ec967ddf56d2-exec-1              0/1     Pending            0              174m
lightning-server-5439ec967ddf56d2-exec-2              0/1     Pending            0              174m
lightning-server-5439ec967ddf56d2-exec-3              0/1     Pending            0              174m
lightning-server-driver                               1/1     Running            0              13h
lightning-solr-555664b544-fpwlc                       1/1     Running            0              12h
lightning-zeppelin-7975969f5f-fl6mj                   1/1     Running            0              12h
ollama-6977d564d8-l495p                               1/1     Running            0              68m
opensearch-cluster-master-0                           1/1     Running            0              179m
opensearch-cluster-master-1                           1/1     Running            0              179m
os-opensearch-dashboards-57f49f85fc-zpfsn             1/1     Running            0              12h
privateai-566df5d786-68f49                            1/1     Running            0              162m
8. Create Lightning user account
· Login to ‘lightning-server-driver’ pod
kubectl exec --tty --stdin lightning-server-driver -n zetaris /bin/sh
· Run the dev-account.sh script
cd /home/zetaris/lightning/bin/

./dev-account.sh
9. Launch Zetaris
Please Open browser window (preferably chrome) from any computer that is connected to VM and can access the machine on which Zetaris is installed.
Use URL from route created earlier (e.g. http://zetaris-zetaris.apps.zetaris.iac.ssc) to launch Zetaris from browser window.